
Write something
Pinned

⭐
🔥
6h •
🌸 Happy Mother’s Day to the mothers in our baking community 🌸
Today we pause for a minute to honor the women who bring so much care, patience, and strength into their homes, their kitchens, and this community. So many of you are feeding families, teaching children, carrying traditions, starting new ones, and still finding time to show up here with encouragement for somebody else. That matters. Bread has always been more than flour, water, salt, and time. It’s care made visible. To every mother, grandmother, bonus mom, auntie, mentor, and woman who has helped nurture someone along the way, we see you and we appreciate you. I hope today brings you a little love, a little rest, and something warm from the oven. Happy Mother’s Day. Henry ⭐🔥

Pinned
⭐
🔥
2d •
Saturday Bake-Along: Pretzel Loaf 🥨 | Working Thread
Good morning, bakers. Today's the day. Two tracks, same destination: Yeasted with Poolish — if you started your poolish last night, you're on the dinner-ready timeline. Sourdough — longer build, deeper flavor. Worth the wait. Both recipes finish with the alkaline bath, that mahogany crust, and the snap that makes a pretzel loaf a pretzel loaf. Drop in the thread: - Where you are in the process - Photos as you go (poolish, dough, shaped, boiled, baked, sliced) - Questions, anytime. No question is too small. - Wins. Fails. Everything in between. Quick reminders: - Bread sling or parchment makes the boil-to-oven transfer way easier - Everything topping goes on right after the boil while the surface is wet, not after the bake - 4.7L water, 120g baking soda, rolling boil before you dunk - Watch the crust color, you want deep mahogany, not just brown Adjust to fit your kitchen: If the alkaline bath feels like a lot, or your pot's not big enough, or you're juggling one Dutch oven and trying to make it all work, split the dough into two smaller loaves. Smaller loaves are easier to handle in the bath, easier to bake, and just as tasty. Bake time will come down a bit, so watch the color and the internal temp. Adjust to the situation you're in. The recipe works for you, not the other way around. Both recipes are in the Recipe Pantry. Full video walk-through is on YouTube if you need a refresher. Let's bake. Perfection is not required. Progress is. ~ Henry ⭐🔥

Pinned
⭐
🔥
17h •
New Series: Baking Through the Seasons (Plus a Free Cheat Sheet)
Started a new YouTube series this week, and I want you to be the first to see it. 🔥 It’s called Baking Through the Seasons, and it’s built around something I see every single year in our community. 🥖 Same flour. 🥖 Same starter. 🥖 Same recipe. Different bread. ☀️ When the kitchen warms up in spring, your starter rises faster.⏱️ Bulk fermentation finishes earlier.🫓 The dough feels softer, stickier, more relaxed than it did a month ago. And most bakers blame the recipe… when really, the room changed. ━━━━━━━━━━━━━━━ 🌱 The first video is live. The Spring Baking Protocol covers the seven adjustments that take you from frustrated to in control when your kitchen starts heating up. I also put together a one-page cheat sheet you can print out and keep next to your scale. It’s the quick-reference version of the whole series. No email opt-in. No signup. Just yours. 📄 Grab the cheat sheet here: https://skoo.ly/spring-baking 🎥 Watch the first video here: https://youtu.be/E5E2sNhgSXE ━━━━━━━━━━━━━━━ ☀️ Spring Baking Protocol 🔥 Summer Baking Protocol 🍂 Fall Baking Protocol ❄️ Winter Baking Protocol By the end of the year, you’ll have a full year-round playbook for every kitchen condition you’ll ever face. ━━━━━━━━━━━━━━━ 👇 Drop a comment below and tell me which season has given you the most trouble. That’s how I know what to dig deeper on next. ⭐ Perfection is not required. Progress is. Come bake with us. Henry ⭐🔥
⭐
🔥
18m •
The Jelly Jar Method.
Some of you know it as the aliquot jar. Same trick, less intimidating name. Take a small piece of your dough at the start of bulk, drop it in a clear jar, mark the starting line, and let it sit right next to your main bowl. That little jar tells you what's happening inside your big batch without you having to guess. Here's the part most people miss: you're not waiting for the dough to double. You're watching for halfway. Roughly a 50% rise on the jar. If you let it hit double, you've already overshot. The dough kept fermenting past peak, the gluten structure started breaking down, and the loaf you bake is going to read flat, gummy, and dense even though you swore you followed the recipe. This is why so many of you have been fighting tight crumb and disappointing oven spring. The fix is simple. Watch the jar, not the clock. Pull when it's halfway up. Watch the lesson, grab a jar from your cabinet, and try it on your next bake. Drop a comment when you do. I want to see your before and after.

🔥
3d •
Stiff Starter & It's Benefits
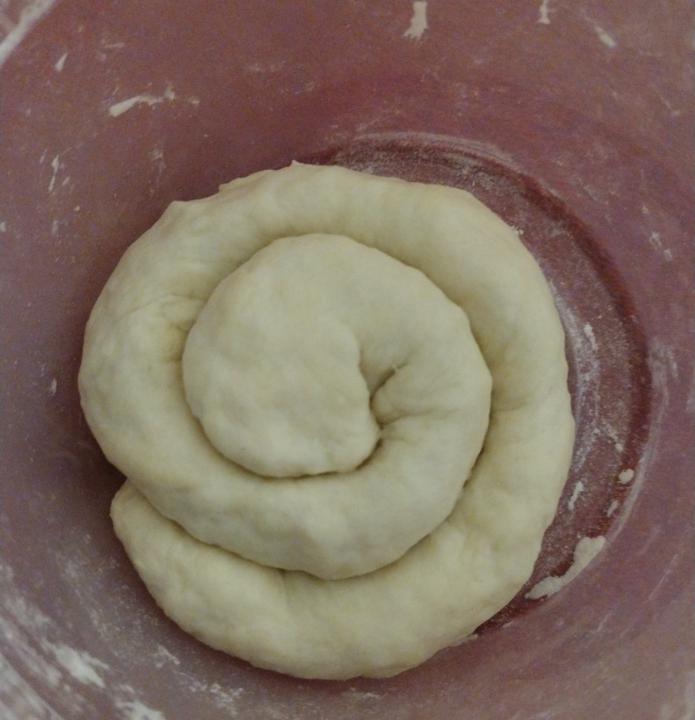
A stiff sourdough starter is typically maintained at 45 - 50% hydration. It offers several advantages over the liquid (100% hydration) starter. Key Benefits: Longer Peak Window: Stiff starters are not as time sensitive as a liquid starter. Why? Because they are denser, they ferment more slowly and stay at peak much longer than liquid starters. In most cases, several hours longer than liquid starters. Liquid starters which might collapse within an hour of peaking Enhanced Yeast Activity: The lower water content boosts yeast growth over lactic acid bacteria (LAB), leading to a milder flavor profile that is less sour and more yeast forward, making it ideal for enriched doughs like brioche, panettone, or cinnamon rolls. Honestly I use my stiff starter for any recipe without issue. Improved Dough Structure: Using a stiff starter helps preserve gluten strength because it reduces enzymatic activity that otherwise breaks down gluten proteins. That gives you.... Better oven spring (taller loaves). Easier handling and shaping, as the dough is less likely to become "slack" or sticky. Resilience in Heat because stiff starters are more stable in hot climates (80°F+). A liquid starter can quickly over-ferment and turn soupy & gloopy in the heat. But a stiff starter holds its structure and ferments at a more predictable pace. Easier Maintenance: Fridge Longevity: Stiff starters can survive longer in the refrigerator between feedings. Sometimes several weeks without developing the strong vinegar smells or acidic breakdown common in liquid starters. Less Mess: Stiff starters are dough-like and do not leave behind the sticky, liquid residue typical of a milkshake or pancake consistency starter. If you'd like to begin your journey with a Stiff Starter say "Squad Me" in the comments!! Here's how to start your Stiff Starter: 3g Active Bubbly Starter 15g Water 30g Flour Mix starter and water together until the water looks milky and the starter is dissolved. Then mix in flour, stirring untill it's too stiff to stir. Pour it out onto a clean counter top, every crumb, and knead the ingredients together until you have a cohesive dough like substance. Lastly roll into a ball or roll out into a strip and roll up like a cinnamon roll and place into your jar. This feed ratio is a 1:5:10 giving you a 50% hydration stiff starter. This will take about 10-14 hours to peak at 73*F. You only need to feed once every 24 hours. I feed at 6pm the next morning when it has peaked I place it in the fridge until time to feed again at 6pm. I don't keep my starter in the fridge for days or weeks... That's my personal preference.
1-30 of 1,608
powered by

skool.com/crust-crumb-academy-7621
#1 Sourdough Community on Skool 🍞
Coaching, not judgment. Sourdough, starter, yeasted, enriched & every bread between.
✅ ProveWorth Certified ⭐⭐⭐⭐⭐
Suggested communities
Powered by