
Write something

May 18 •
Sync Issues
Unable to sync Outlook calendar - message unstable wifi and I know it is a very good signal - have to admit to being very disillusioned

Nov '25 •
Using Layers on Your reMarkable: The Secret Weapon You’re Probably Not Using Enough
Most people use their reMarkable like a simple notebook… but the real magic happens when you start using layers. Layers turn your notebook into a flexible, non-destructive workspace — almost like having multiple transparent sheets stacked on top of each other. Here’s why they matter: ✅ Make changes without messing up your base notes Sketch on one layer, write on another, highlight on another. Erase freely without touching the core content. ✅ Perfect for planners & templates Keep your template clean on the bottom layer, write your plans on a layer above it, and keep your highlights or mood tracking on a third. No accidental erasing ever again. ✅ Powerful for studying or brainstorming Break ideas into layers: – Main notes – Side ideas – Questions – Mind map sketches You can toggle each layer on/off to reduce clutter. ✅ Great for creators Artists, designers, and doodlers can ink, shade, trace, and experiment without fear of ruining their artwork. Your challenge today: Use at least 3 layers in one of your notebooks. Try writing, highlighting, and sketching each on a separate layer — then toggle them and see how much cleaner and more powerful your pages feel. If you already use layers, drop a tip below 👇 If you’ve never touched them, this is your sign to start.


Jan 17 •
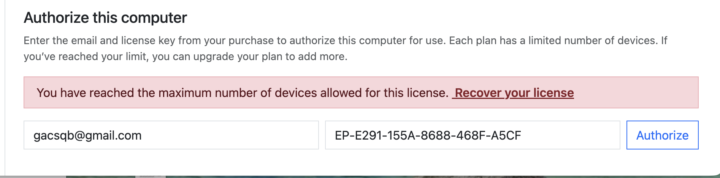
Authorize App Help
When I try to authorize the app on my computer, I get the following notice. I only have one computer. Can anyone tell me what to do? I have not been able to authorize the app in order to use the CalSync App
Nov '25 •
🙋🏾♂️ Developer Mode. What is it?
Most people use their reMarkable straight out of the box… but there’s a whole hidden side to the device once you flip on Developer Mode. Some love it because it unlocks SSH access, custom templates, deeper backups, and automation. Others avoid it because it sounds complicated or risky.
Poll
24 members have voted
1-5 of 5

skool.com/einkpads
Learn. Share. Create. — Empowering reMarkable, Supernote, and BOOX tablet users worldwide. einkpads.com
Leaderboard (30-day)
1

+4
2

+4
3

+3
4
+3
5

+3
Powered by