Activity
Mon
Wed
Fri
Sun
Mar
Apr
May
Jun
Jul
Aug
Sep
Oct
Nov
Dec
Jan
Feb
What is this?
Less
More
Owned by Albert
Free swing‑trading school for 9–5 pros who want clear levels, rules, and less screen time using the No‑Chase Swing Method.
Swing trade U.S. stocks & crypto around your 9–5 in ~10 minutes a night with a rules-based no-chase method so you stop staring at charts.
Memberships
WavyWorld
45.1k members • Free
AI Automation Society
257.9k members • Free
Creator Accelerator
232 members • $70/month
213 contributions to Swing Trading Desk

15h •
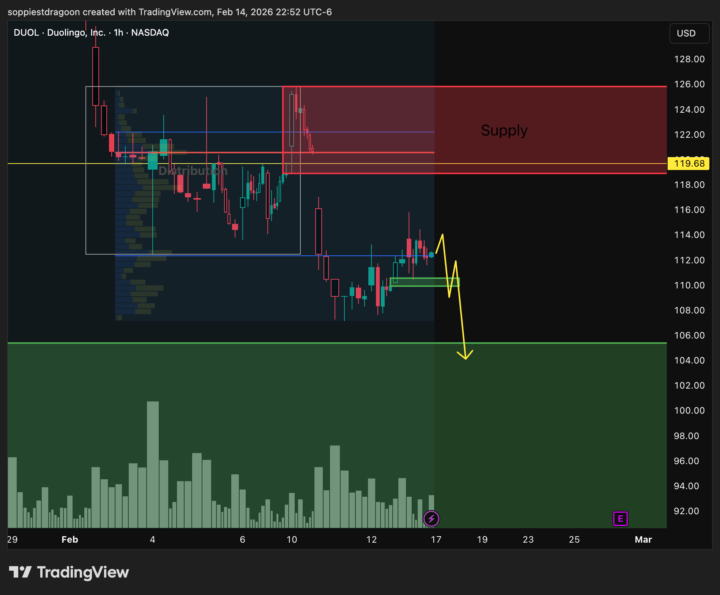
DUOL — Bearish — Swing
⚡ EXECUTION PACKAGE - Entry Zone: 110.00-112.00 (IF lower high forms below this demand) - Stop Loss: 114.50 - Target 1: 105.00 — Take 50% profit, move stop to breakeven - Target 2: 100.00 — Manage remainder or full exit - Risk Sizing: $50-$100 per setup - Invalidation: Acceptance above 114.50 (daily close above) 📋 GAME PLAN SCENARIO A - DISTRIBUTION WITHOUT REACHING SUPPLY: IF price forms lower high below 110 + breaks prior low → THEN enter short in 110-112 zone IF entry fills → THEN hold until stop or target hit IF stop hit at 114.50 → THEN exit completely, no re-entry without new plan IF T1 reached at 105 → THEN take 50% profit, move stop to 111 (breakeven) IF T2 reached at 100 → THEN take remaining 50% or hold for continuation SCENARIO B - PRICE RUNS TO HTF SUPPLY FIRST: IF price reaches 319-325 supply zone → THEN wait for new plan (potential short from supply) IF price holds above 110 demand → THEN thesis invalid, wait for new structure KILL SWITCH: IF price accepts above 114.50 → THEN distribution thesis broken, exit if positioned 💡 SETUP CONTEXT Structure: HTF supply sits at 319-325, but price may distribute before reaching it Edge: If current demand at 110 fails (lower highs + lower lows), confirms distribution Why This Works: Early distribution signal = better R/R than waiting for supply test Conviction: 5/10 — Requires confirmation via lower high formation, not a "short now" setup ⚠️ CRITICAL NOTE: This is structure from last week's analysis. The key is watching HOW price behaves at 110. Do NOT short blindly. Entry only valid if: 1. Price forms a lower high below 110 demand 2. Price breaks the prior swing low 3. Lower high + lower low = distribution confirmation If price reclaims 110 and pushes higher, wait for the HTF supply at 319-325 instead.
0
0
15h •
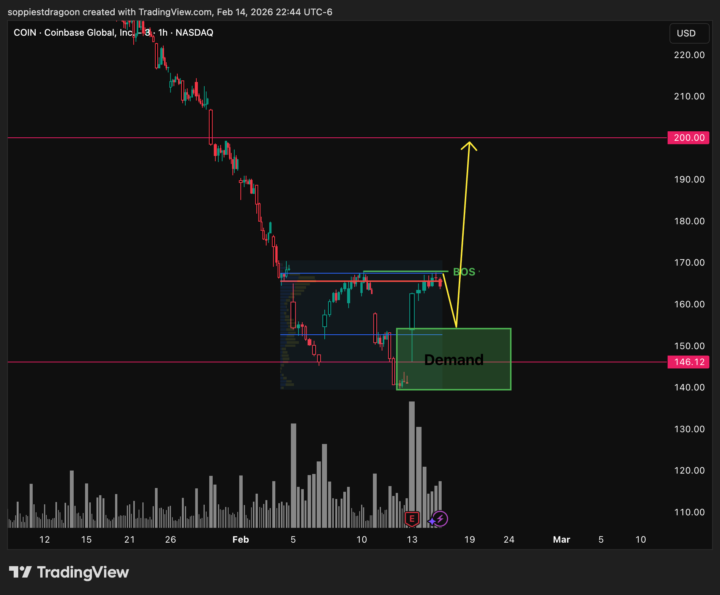
COIN — Bullish — Swing (conditional)
⚡ EXECUTION PACKAGE - Entry Zone: WAIT - Entry only valid AFTER break above 168 AND successful retest of 139-154 - Stop Loss: 138.50 - Target 1: 185.00 — Take 50% profit, move stop to breakeven - Target 2: 200.00 — Manage remainder or full exit - Risk Sizing: $50-$100 per setup - Invalidation: Acceptance below 138.50 (daily close below) 📋 GAME PLAN PHASE 1 - CONFIRMATION REQUIRED: IF price breaks and holds above 168 → THEN wait for pullback to 139-154 zone IF price fails to break 168 → THEN no entry, setup invalid IF price breaks 168 but doesn't pull back → THEN wait, do not chase PHASE 2 - AFTER PULLBACK TO 139-154: IF entry fills in demand zone → THEN hold until stop or target hit IF stop hit at 138.50 → THEN exit completely, no re-entry without new plan IF T1 reached at 185 → THEN take 50% profit, move stop to 154 (breakeven) IF T2 reached at 200 → THEN take remaining 50% or hold for continuation IF price accepts below 138.50 → THEN thesis invalidated, exit immediately 💡 SETUP CONTEXT Structure: Potential demand building at 139-154 after liquidity sweep of 146 key level Edge: Demand only valid with proof of strength (break above 168) followed by successful retest Why This Works: Two-phase confirmation reduces false entries, asymmetric R/R to targets Conviction: 6/10 — Good structure, but requires patience for full setup confirmation ⚠️ CRITICAL NOTE: This is a TWO-PHASE SETUP. Do NOT enter at current levels. Entry only becomes valid after: 1. Break and hold above 168 (proof of strength) 2. Pullback to 139-154 zone (retest of demand) Missing either phase = no trade.
0
0
11d •
[ACTIVE] – IGV – LONG – SWING
Status: Just Entered. Managing TRADE SETUP (EXECUTION FIRST) - Entry Zone / Trigger:76.68 – 82.78 HTF demand reaction(Trade exists only because price tagged demand — no chasing) - Stop / Invalidation:Acceptance below 76.68 (HTF demand failure) - Initial Targets:T1: 98T2: 110 - Order Type:Limit entry at demand reaction - Risk / Size Guidance:Max 0.5–1R risk(If you normally risk $100 per trade, this is a $50–$100 risk idea) MANAGEMENT PLAN (IF → THEN RULES) - IF entry fills → THEN no changes unless stop or structure breaks. - IF stop is hit → THEN trade is closed. No re-entry without a new plan. - IF price reaches 98 (T1) → THEN take partial and reduce risk (BE or structure). - IF price reaches 110 (T2) → THEN manage remainder or close based on momentum. - IF price accepts below HTF demand → THEN thesis is invalidated. CONTEXT & THESIS (OPTIONAL READ) - Structure:Pullback into higher-timeframe demand within the software sector after heavy downside expansion. - Level Logic:Demand previously acted as a base where buyers stepped in. Current reaction confirms participation. - Why This Works:Trading IGV instead of individual software names lowers: - Invalidation Beyond Stop: Sustained acceptance below HTF demand signals structural failure. Tap the 🔔 bell on this post to turn on notifications.No bell = you miss the updates.
![[ACTIVE] – IGV – LONG – SWING](https://assets.skool.com/f/9eedb258b74146de93effd8f637d192b/8f726757c6cb42f89a0c9c1ab49794ed8f3a4aa7271a41a4b0d9821bfde2d13c-md.png)
0 likes • 6d
Trade playing out so far
0 likes • 2d
I added some position size. We consistently have high volume at these levels.
3d •
📊 SETUPS TO WATCH - 2/13/2026
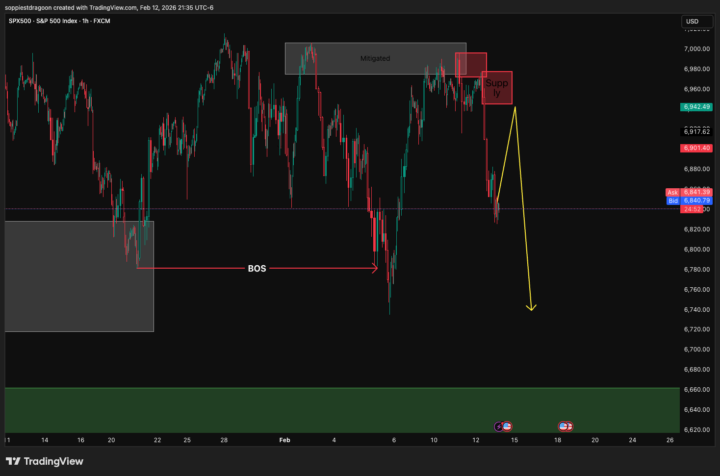
Here are 2 index short setups I'm tracking. Post your plans below if you're taking either. SETUP 1: NQ (US 100) — BEARISH — Swing ⚡ EXECUTION PACKAGE - Entry Zone: 25239-25339 (on LTF distribution confirmation) - Stop Loss: 25350 - Target 1: 24200 — Take 50-70% profit - Target 2: 23828 — Manage remainder or full exit - Risk Sizing: $50-$100 per setup - Invalidation: Acceptance above 25339 (daily close above) 📋 GAME PLAN IF price trades into 25239-25339 AND shows 5m/15m distribution → THEN enter short IF stop hit at 25350 → THEN exit completely, thesis wrong IF T1 reached at 24200 → THEN take 50-70% profit, trail remainder IF T2 reached at 23828 → THEN exit remaining position IF price accepts above 25339 → THEN thesis invalidated, exit if still in 💡 SETUP CONTEXT Structure: Supply zone at 25239-25339, waiting for retest Edge: LTF distribution at supply = rejection and continuation lower Why This Works: Internal swing low at 24200 gives logical first target, 23828 is ultimate structural target Conviction: 6/10 — Need to see the LTF distribution confirmation first ________________________________________________________________________________________________ SETUP 2: SPX 500 (ES) — BEARISH — Swing ⚡ EXECUTION PACKAGE - Entry Zone: 6945-6977 (on LTF distribution confirmation) - Stop Loss: 6985 - Target 1: 6735 — Full exit or take majority - Risk Sizing: $50-$100 per setup - Invalidation: Acceptance above 6977 (daily close above) 📋 GAME PLAN IF price trades into 6945-6977 AND shows 5m/15m distribution → THEN enter short IF stop hit at 6985 → THEN exit completely IF T1 reached at 6735 → THEN full exit (or take 70% and trail) IF price accepts above 6977 → THEN thesis invalidated, exit 💡 SETUP CONTEXT Structure: Supply at 6945-6977, single demand target at 6735 Edge: Cleaner structure than NQ — binary setup with one clear target Why This Works: Simpler management, less decision-making mid-trade Conviction: 7/10 — Cleaner structure than NQ, prefer this setup
0
0
3d •
Win For The Method: Weekend S&P / US100 Plan Respected Perfectly
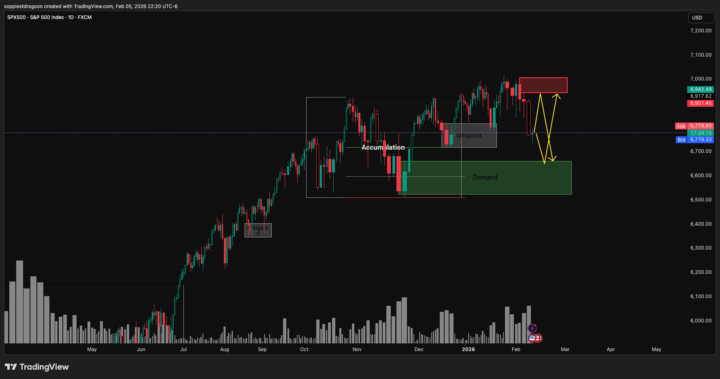
Quick win for the method: - This weekend we mapped out S&P 500 / US100 with: - - Bearish daily impulse - - Weakened demand - - 6945–7006 as key supply - - 6524–6662 as next valid demand Price did exactly what we planned: - Retraced into 6945–7006 supply - Showed lower‑time‑frame distribution + liquidity sweep + break of structure down I didn’t catch the trade live, but the No‑Chase Swing framework nailed the structure and zones. For you, that’s the real win: the process works. Full breakdown with charts and lessons is posted in the Market Analysis / Watchlist tab. Go study it, then post your “ideal execution” plan in Trade Reviews & Help if you want feedback.
0
0
1-10 of 213

@albert-wang-6506
9–5 pros: swing US stocks + BTC/ETH.
No‑Chase Method.
Timestamped setups BEFORE trigger.
No scalping, penny stocks, or alts.
Active 2h ago
Joined Aug 20, 2025