

Apr 27 •
Rigging/Animation project: bonetools (version 0.1)
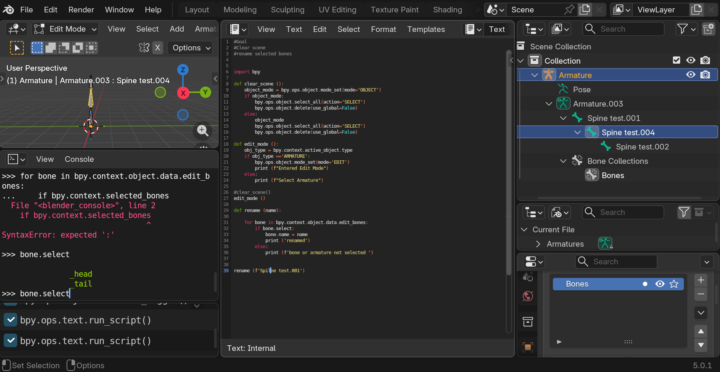
Hey. In the last two weeks, I've worked a lot on my little rigging script. It's not a addon or extension yet, the UX is pretty horrific and it's missing at couple of important features. The code so far is just a long list of pretty straightforward operators, as well as a Panel, with Buttons to execute every one of these operators. The operators basically fall into four categories: 1. the ones that have to do with Vertex Groups (these are mainly there to complement the "Ctrl G" and "Shift G" shortcuts) 2. the operators that add bones to an armature and place them correctly - the advantage to normal bone duplication+extrusion is, that the bones will be automatically renamed in the same step 3. the operators that add constraints to a group of bones 4. some additional utilities that deal with bones, like one to change the custom shapes and color of selected bones, and one to quickly align location/rotation/scale of a a group of bones with another group of bones One of the most important features that isn't done yet are what I called "rig relations", it's basically the idea that some operators can only take effect, if for every selected bone, there is a bone with a similar name in the armature. An example, where this is useful, is a FK/IK switch, where the rigger needs to create relationships between the deform bones and the FK bones, as well as between the deform bones and the IK bones as well. So, I hope I get time to add that asap. I also want to split up the code into multiple files and make the thing into an addon / extension, that's maybe important, too. Here's the script so far: https://codeberg.org/miriculous/bonetools/src/branch/main/vgops.py So, yeah, that's pretty much where I am at the moment. I do have to say that I thought the Blender API wasn't very intuitive to learn for me (my experience with coding was mostly with JS web development and GDScript). I still have some question (like why the vertex selection data doesn't update unless you switch to object mode ... ?). But overall, I think I made progress.
3
0

Apr 4 •
Single Axis Keying Panel addon
Hi again, I just want to update info on my small script for creating keyframes while animating in Blender. The current version is v0.30. What has changed? I cleaned up the code and added a feature that informs the user when no object is selected. Previously, if no object was selected, the name of the previously selected object was displayed, which was strange. Now, when no object is selected, it’s impossible to add keyframes. It works in B4.1+

Mar 12 •
Part 2 Capstone
I built a small script with three core functions: 1. Create Worldspace Bone – Generates a worldspace bone based on the currently selected bone. 2. Select Worldspace Bone – Selects the corresponding worldspace bone if one exists through this script. 3. Delete Script Bones – Removes only the bones that were created by this script, leaving the original rig untouched. The primary goal was to experiment with bone manipulation in Blender and get hands-on experience with the relevant API. For future iterations, If I built this again i'd plan to organize generated bones into a dedicated temporary collection, which will simplify both the selection and deletion logic considerably. References & Attribution Since Blender's manual doesn't always cover pose bone API methods in depth, I used AI assistance to look up specific references such as bpy.context.selected_pose_bones and similar properties. I also referenced an existing script and a YouTube tutorial for context. All logic and implementation decisions, however, are my own, applying concepts learned throughout this course.
Mar 5 •
Capstone part one
I am more interested in animation and rigging. apparently when dealing with bones blender changes the game it is not that simple have to do a lot of mode changes and separate operations for separate modes just like how we manually do it. Anyway finally figured to rename bones

Mar 2 •
Итоговый проект по второй части
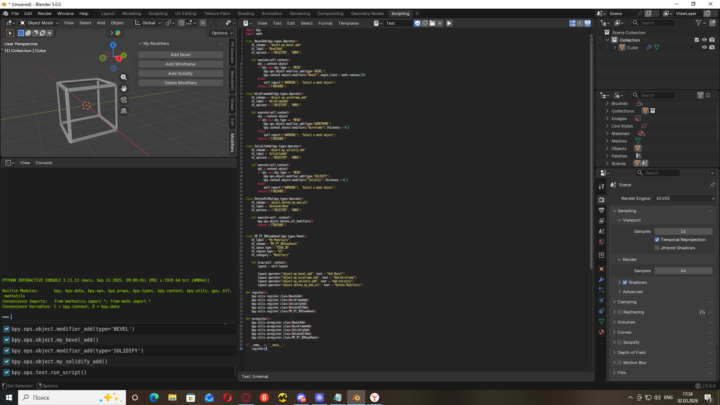
I have created a tool in the 3D viewport, which has 3 basic modifier buttons and a button to remove all modifiers. I also have a couple of questions for you as a specialist. How do you rate the profession of a technical artist? Is it a good profession for the future? Is there a chance for someone like me to become a technical artist? And here is the project code: import bpy import math class BevelAdd(bpy.types.Operator): bl_idname = 'object.my_bevel_add' bl_label = 'BevelAdd' bl_options = {'REGISTER', 'UNDO'} def execute(self,context): obj = context.object if obj and obj.type == 'MESH': bpy.ops.object.modifier_add(type='BEVEL') bpy.context.object.modifiers["Bevel"].angle_limit = math.radians(20) else: self.report({'WARNING'}, 'Select a mesh object') return {'FINISHED'} class WireFrameAdd(bpy.types.Operator): bl_idname = 'object.my_wireframe_add' bl_label = 'WireFrameAdd' bl_options = {'REGISTER', 'UNDO'} def execute(self,context): obj = context.object if obj and obj.type == 'MESH': bpy.ops.object.modifier_add(type='WIREFRAME') bpy.context.object.modifiers["Wireframe"].thickness = 0.1 else: self.report({'WARNING'}, 'Select a mesh object') return {'FINISHED'} class SolidifyAdd(bpy.types.Operator): bl_idname = 'object.my_solidify_add' bl_label = 'SolidifyAdd' bl_options = {'REGISTER', 'UNDO'} def execute(self,context): obj = context.object if obj and obj.type == 'MESH': bpy.ops.object.modifier_add(type='SOLIDIFY') bpy.context.object.modifiers["Solidify"].thickness = 0.1 else: self.report({'WARNING'}, 'Select a mesh object') return {'FINISHED'} class DeleteAllMod(bpy.types.Operator): bl_idname = 'object.delete_my_mod_all' bl_label = 'DeleteAllMod' bl_options = {'REGISTER', 'UNDO'} def execute(self, context): bpy.ops.object.delete_all_modifiers() return {'FINISHED'} class MY_PT_3DViewPanel(bpy.types.Panel):
1-30 of 30

Leaderboard (30-day)
1

+11
2

+7
3

+4
4

+4
5

+3
Powered by