Activity
Mon
Wed
Fri
Sun
Jul
Aug
Sep
Oct
Nov
Dec
Jan
Feb
Mar
Apr
May
Jun
What is this?
Less
More
Memberships
Coach Cam's Peptide Academy
1.4k members • $10/m
The Iron Forge Brotherhood
29.3k members • Free
BioOptimization Collective
278 members • Free
Research Radar
11.8k members • $10/month
Peptides 101
2.1k members • Free
2 contributions to BioOptimization Collective

30d •
FIX YOUR CELLS! The Secret "Zombie Cell" Protocol (Dr. Seeds Method)
"The Mitochondrial Renaissance" explores Dr. William Seeds’ pioneering approach to cellular health by strategically pairing SS-31 and MOTS-c. It moves away from traditional symptom management to focus on restoring the cell’s primary engine: the mitochondria. Core Summary: The "Prime, Repair, and Build" Method 1. The Biological Foundation (The Engine Fix): 2. SS-31: The Structural Restorer (Step 1) 3. MOTS-c: The Metabolic Architect (Step 2) 4. The Seeds Protocol Strategy: The article concludes that by focusing on Redox balance (SS-31) and Metabolic efficiency (MOTS-c), Dr. Seeds provides a blueprint for a "cellular reset." This combination doesn't just mask fatigue; it re-engineers the body's ability to produce energy and heal from within. The Mitochondrial Reset Protocol (10-Week Cycle) This protocol utilizes 10 mg vials of both SS-31 and MOTS-c, reconstituted with 200 units (2 mL) of Bacteriostatic Water. Phase 1: The Structural Prime (Weeks 1–2) Goal: Stabilize cardiolipin and stop oxidative "leaks" using SS-31. - Peptide: SS-31 - Daily Dose: 5 mg (100 units / 1 full insulin syringe) - Frequency: Once daily in the morning. - Duration: 14 days. - Dr. Seeds' Insight: You must fix the "scaffolding" of the mitochondria first. Starting MOTS-c too early in a highly inflamed system can lead to diminishing returns. Phase 2: The Synergy Stack (Weeks 3–6) Goal: Continue repair while signaling for new mitochondrial growth (Biogenesis). Morning Routine (Daily): - Peptide: SS-31 - Dose: 5 mg (100 units) Workout/Mid-Day Routine (Mon/Wed/Fri): - Peptide: MOTS-c - Dose: 5 mg (100 units) - Timing: Administer 30–60 minutes before resistance training or intense cardio to leverage the "exercise mimetic" signaling. Phase 3: The Washout (Weeks 7–10) Goal: Allow the body’s endogenous (natural) redox signaling to recalibrate. - Action: Discontinue all peptide use. - Dr. Seeds' Insight: Prolonged use of exogenous signaling molecules can cause the cell to become "lazy." The washout ensures your cells maintain their own ability to manage oxidative stress and energy production.


0 likes • 29d
I see it says after running the cycle discontinue all peptide use...Does that mean the SS-31 and Mots-C or all peptides currently taking? I'm taking Tirz and don't want to stop it for 4 weeks
Feb 6 •
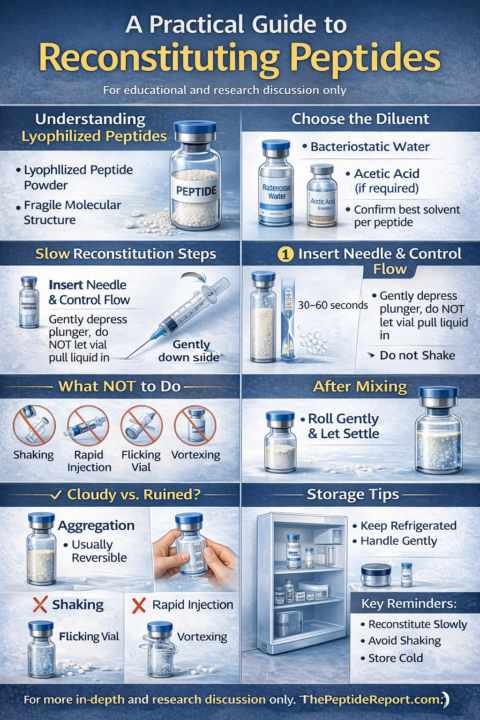
A Practical Guide to Reconstituting Peptides/Calculator (Educational Use Only)
Proper peptide reconstitution is one of the most overlooked—and most important—steps in peptide research handling. Many issues people encounter (cloudiness, clumping, reduced effectiveness) are not product defects, but reconstitution errors related to speed, agitation, or solvent choice. Bio-Opt Tracking Calculator: https://peak-bio-path.base44.app This article outlines best-practice principles for reconstituting lyophilized peptides for educational and research discussion only. 1. Understanding Lyophilized Peptides Most peptides are supplied as a lyophilized (freeze-dried) powder. This form improves stability during storage and transport but makes the peptide mechanically sensitive once liquid is introduced. Key point: Peptides are fragile molecular chains, not resilient compounds. How liquid is introduced matters. 2. Choosing the Correct Diluent The most commonly used diluent for research peptides is: - Bacteriostatic water (contains 0.9% benzyl alcohol) In specific cases (e.g., certain fat-loss or acidic peptides), acetic acid may be used in combination, but this depends on peptide characteristics. General educational guidance: - Most peptides tolerate bacteriostatic water well - Always confirm compatibility for the specific peptide being studied 3. Step-by-Step Reconstitution Technique Step 1: Prepare the vial - Allow the peptide vial to reach room temperature briefly if stored cold - Swab the stopper with alcohol Step 2: Control the vacuum - Many vials have a strong vacuum seal - Do not allow the vial to pull liquid in rapidly Instead: - Insert the needle - Gently depress the plunger to control the flow Step 3: Introduce liquid slowly - Aim the needle toward the inside wall of the vial - Let the liquid run down the side - Take 30–60 seconds if needed Rapid force = turbulence = aggregation risk. 4. What Not to Do Avoid the most common mistakes: - ❌ Shaking the vial - ❌ Rapid injection of diluent - ❌ Flicking or vertexing - ❌ Repeated aggressive handling
1 like • Mar 9
Thanks
1-2 of 2

@joseph-shepard-5614
A GLP-1 newbie looking to converse with other like minded people.
Active 8h ago
Joined Mar 8, 2026
Powered by