

🔥
2d •
🪨 Rocks
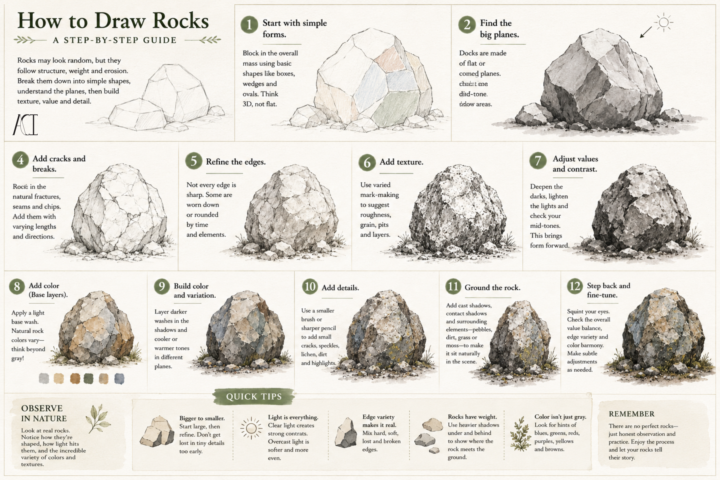
Rocks aren’t complicated~ they’re just honest. When people first try drawing rocks, they often focus on every crack and texture they can see. The result usually ends up feeling busy instead of believable. Start by finding the largest shapes first~ Every rock has a sense of weight~ Think about where it rests, how its surfaces catch the light, and which planes turn away into shadow. Once that foundation is solid, you can begin adding smaller chips, fractures, rough textures, and subtle color variations. Another thing to remember: nature rarely repeats itself. Some rocks are smooth from years of moving water. Others are jagged from fresh breaks. Some are covered in moss or lichen, while others have sharp edges that haven’t had time to weather. The more you observe real rocks, the more you’ll notice they tell the story of where they’ve been. Slow down, study the forms, and let the texture come last. What’s your favorite kind of landscape to draw~ mountains, forests, beaches, or deserts?
🔥
4d •
☁️ Painting Clouds: Beyond Fluffy
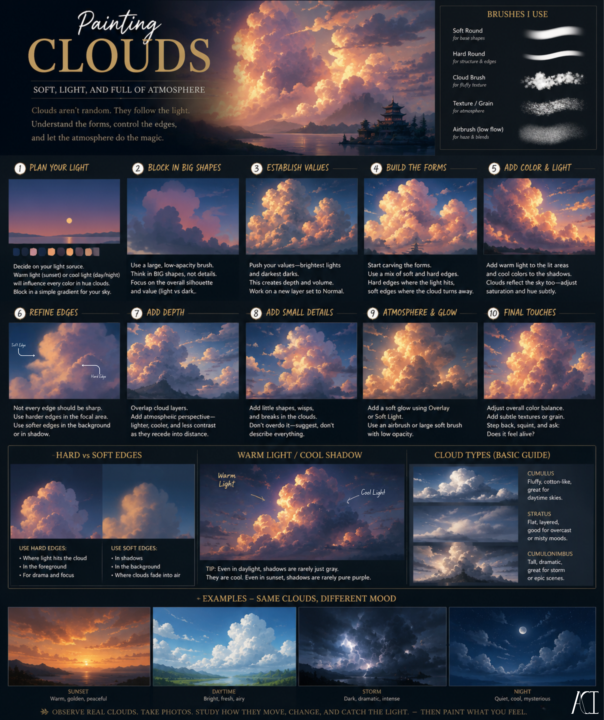
Whether you paint digitally or traditionally, clouds follow the same principles: form, light, value, and atmosphere. The tools may be different, but the fundamentals don’t change. A few things to be conscious of: ☁️ Start with the big shapes. Don’t paint every puff individually. Squint at your reference and look for the overall silhouette first. Think about sculpting one large form before carving out the details. ☀️ Choose your light source first. Clouds don’t glow everywhere equally. Decide where your sun or light source is before you begin. Your highlights, shadows, and even the colors in the sky should all support that decision. 🎨 Edges tell the viewer where to look. Not every cloud edge should be crisp. Hard edges naturally draw attention, while soft edges create depth and atmosphere. A painting with only hard edges~ or only soft ones~ often feels flat. 🌤️ Shadows have color. Cloud shadows aren’t just gray. They often reflect the color of the sky, picking up blues, violets, and cool grays. During sunrise or sunset, those relationships shift into warmer hues. 🌫️ Suggest more than you describe. Clouds are constantly changing. If you paint every little bump and wisp, they can start to feel stiff. Suggest the forms, then let the viewer’s eye finish the rest. Traditional vs. Digital 🎨 Traditional artists: Work from light to dark (or dark to light, depending on your medium), and remember that lifting paint, glazing, and preserving your whites all create different cloud effects. Watercolor, gouache, acrylic, and oils each handle edges differently~ lean into what your medium does best instead of forcing it to behave like another. 💻 Digital artists: It’s tempting to rely on cloud brushes, blur tools, or smudge tools, but they work best after you’ve established the form. Build the cloud first, then use your digital tools to enhance it—not to replace the underlying structure. One last tip… GO OUTSIDE~!!! Some of the best cloud studies you’ll ever make won’t happen at your desk.
🔥
Jun 6 •
Perspective Drawing Guide~
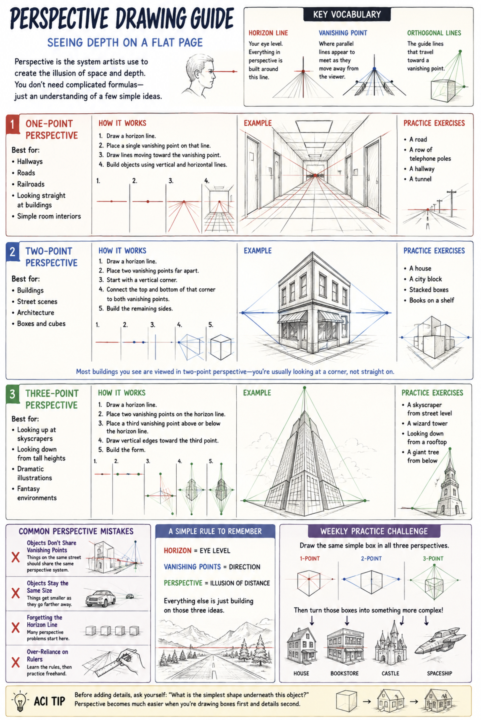
One of the biggest hurdles artists face is figuring out how to make a flat page feel like it has real depth and space. Perspective is the tool that helps bridge that gap. This guide covers the fundamentals of one-point, two-point, and three-point perspective, along with common terminology, practice exercises, and some of the most frequent mistakes artists encounter when learning. Whether you're interested in landscapes, architecture, fantasy worlds, urban sketching, comics, or illustration, understanding perspective will strengthen the structure behind your artwork. Don't worry about mastering everything at once. Perspective is a skill that develops through repetition and observation. Start simple, focus on understanding how forms occupy space, and remember that even complex scenes are often built from basic boxes and shapes. Take your time, work through the exercises, and most importantly~ have fun experimenting with depth and dimension. ACI Tip: When a drawing feels "off," don't immediately blame your rendering skills. More often than not~ the issue is structural. Check your horizon line, vanishing points, and underlying forms first. Strong foundations make every artistic style look better. 🎨✨

Feb 26 •
Sharpie shows Through
For anyone painting signs or murals where there is a lot of sketching and erasing, I thought I'd share this tip. Sharpie shows through. Yep, I cleaned up all my pencil lines and of course the erase makes it's own subtle marks, but a fresh coat of white paint over all my painstaking work (it does give one a moment's pause) and then **poof** the background is all fresh again and the line you wanted to keep at the only ones showing. Thought I'd share in case you didn't know this little hack.

1-14 of 14
powered by

skool.com/theartcollectiveinternational-5768
A welcoming home and hub for artists, creatives, and curious minds to learn, create, share, and grow together.
Suggested communities
Powered by