

Apr 5 •
My Cybersecurity Journey – Level Up!
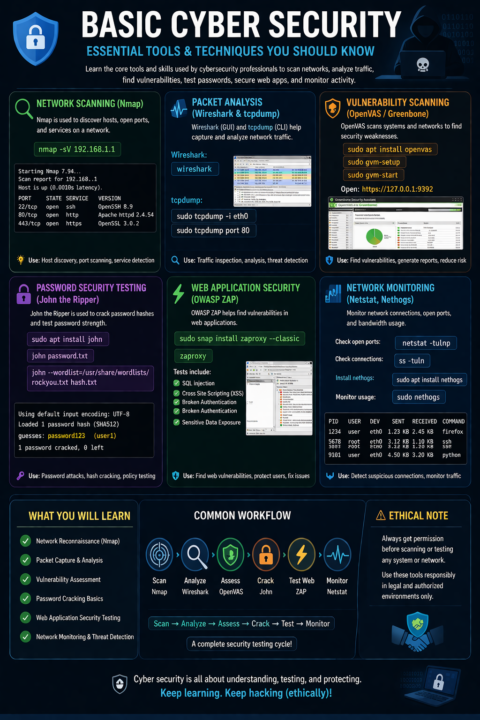
Lately, I’ve been diving into Basic Cybersecurity, exploring essential tools and techniques to protect networks and systems. Here’s what I’ve been up to: - Packet Analysis – Wireshark & tcpdump 🖥️ - Vulnerability Scanning – OpenVAS / Greenbone 🔍 - Password Testing – John the Ripper 🔑 - Web App Security – OWASP ZAP 🌐 - Network Monitoring – Netstat & Nethogs 📊 Key takeaways: - How attackers exploit systems & web apps - Detect suspicious connections & malware traffic - Strengthen passwords & enforce security policies - Generate actionable security reports
3
0
Mar 3 •
Task 1: Package Management & Software Installation
🎯 Objective Inaan fahmo sida Linux u maareeyo software-ka iyo sida packages loo rakibo, loo cusbooneysiiyo, loona tirtiro si nidaamsan. 📚 Concepts Learned Waa maxay package manager Repositories Dependencies Update vs Upgrade 🛠 Commands Practiced sudo apt update sudo apt upgrade sudo apt install nginx sudo apt remove nginx apt list --installed 🧠 Key Understanding Waxaan fahmay in: apt update uu cusbooneysiiyo liiska packages apt upgrade uu update gareeyo software-ka la rakibay Software kasta uu leeyahay dependencies Repository sax ah uu muhiim u yahay security & stability Challenges Faced Dependency conflicts Broken packages mararka qaar ✅ Outcome Hadda waxaan si kalsooni leh u maamuli karaa software installation iyo updates server Linux ah
Mar 3 •
From Task 3 - Task 8
📌 Task 3: Firewall & Basic Security (UFW & SSH) Task-kan waxaan diiradda saaray amniga aasaasiga ah ee server-ka, si aan u xakameeyo cidda geli karta iyo ports-ka furan. Waxaan bartay sida UFW loogu maamulo firewall rules (allow/deny), gaar ahaan ports-ka muhiimka ah sida SSH (22) iyo web ports (80/443). Waxaan fahmay in server ammaan ahi u baahan yahay in la furo kaliya ports-ka loo baahanyahay, lana xiro wax kasta oo kale, si loo yareeyo khatarta attacks-ka. 📌 Task 4: Disk, Storage & File Systems Task-kan waxaan bartay sida disk-yada iyo storage-ka loo maareeyo, iyo sida file system-ku u shaqeeyo. Waxaan fahmay farqiga u dhexeeya partitions, mounts, iyo storage usage (space). Sidoo kale waxaan bartay sida loo hubiyo disk buuxsami, loo sameeyo mount points, loona fahmo habka Linux u kaydiyo files-ka (permissions + ownership). Tani waxay muhiim u tahay server aan production ahayn ama mid documents badan lagu kaydinayo. 📌 Task 5: Processes, Services & systemctl Halkan waxaan bartay sida Linux u maamulo processes iyo services, iyo sida adeegyada loogu xakameeyo systemctl. Waxaan fahmay in service uu yahay barnaamij si joogto ah u socda (tusaale nginx, mysql), halka process uu noqon karo hawl kumeelgaar ah. Waxaan baranay sida loo start/stop/restart, loo hubiyo status, iyo sida service loogu dhigo enabled si uu auto u shido marka server-ka reboot noqdo. 📌 Task 6: Logs, Monitoring & Troubleshooting Task-kan wuxuu iga dhigay qof si fiican u raadiya sababta cilad u dhacday. Waxaan bartay in logs-ku yihiin “xogta runta ah” ee server-ka, oo laga helo qaladaadka services-ka, security events, iyo system warnings. Waxaan ku tababartay monitoring si aan u ogaado CPU/RAM/Disk/Network usage, kadibna aan u isticmaalo logs iyo status checks si aan u xalliyo ciladaha sida service down, permission issues, ama config errors. 📌 Task 7: Web Server Basics – Apache & Nginx Task-kan waxaan bartay aasaaska web servers-ka, gaar ahaan Apache iyo Nginx, iyo sida server-ka loogu diyaariyo inuu host gareeyo website/app. Waxaan fahmay doorka ports (80/443), virtual hosts/server blocks, iyo sida loo tijaabiyo in web server-ku shaqeynayo. Sidoo kale waxaan bartay fikradda reverse proxy (Nginx → Node.js/React apps) iyo sababta Nginx loogu jecel yahay performance iyo proxy setups.
1
0
Mar 3 •
Networking Basics & Configuration
Networking-ka wuxuu i baray in maamulka server-ku uusan ku ekaan “internet wuu shaqeeyaa ama ma shaqeeyo,” balse uu yahay faham isku xiran oo ka bilaabma interface-ka, ka gudba routing, kuna dhammaada DNS, firewall, iyo service testing. Intii aan ku shaqeynayay qodobadan, waxaan bartay in cilad kasta oo network ah lagu kala saari karo: (1) interface ma shaqeynayaa? (2) IP ma sax baa? (3) gateway/route ma jiraa? (4) DNS ma shaqeynayaa? (5) ports/services ma furan yihiin? Habkan fikirka ah wuxuu iga dhigay inaan si nidaamsan u troubleshoot-gareeyo. 1) Network Information & Status Marka ugu horeysa ee aan bilaabo cilad-baarista, waxaan ka bilaabaa xog uruurin (network status). ip a iyo ip addr show waxay ii muujiyaan dhammaan interfaces-ka iyo IP-yada ku xiran, taasoo ii sahasha inaan ogaado interface-ka saxda ah (eth0/ens33/wlan0) iyo in uu IP helay. ip link wuxuu si degdeg ah ii tusaa interface-ka inuu UP/DOWN yahay, halka ip route uu ii sheego routing table-ka iyo default gateway—taas oo ah xudunta internet-ka. Mararka qaar hostname -I ayaa i siiya aragti degdeg ah oo IP-yada system-ka. Haddii aan adeegsado NetworkManager, nmcli device status wuxuu si cad u muujinayaa devices-ka iyo xaaladooda. Halka ifconfig uu yahay command legacy ah oo wali faa’iido leh (laakiin u baahan net-tools) marka la joogo systems duug ah ama environment gaar ah. 2) Connectivity Testing Kadib marka aan hubiyo interface iyo IP, waxaan u gudbaa tijaabooyin connectivity. ping 8.8.8.8 wuxuu ii xaqiijiyaa in internet-ka la gaarayo IP ahaan (DNS la’aan). Haddii ping-ga IP shaqeeyo, balse ping google.com uusan shaqayn, waxaan si degdeg ah u fahmaa in dhibku u badan yahay DNS. Si aan u arko halka ay packets-ku ku xannibmayaan, traceroute google.com ama tracepath google.com ayaa i tusaya jidka ay maraan (hops) iyo meesha failure-ku ka dhaco. Marka aan rabo diagnostics “live” ah oo isku daraya ping + traceroute, mtr google.com wuxuu noqdaa mid aad u xoog badan, gaar ahaan marka latencies ama packet loss la tuhmo.
1
0

Mar 2 •
Task 3: Server Security & Protection (UFW, SSH Hardening, and Logging)
For this task, I secured the server by configuring UFW, hardening SSH, restricting unnecessary ports, and enabling logging. I used the following commands to complete the setup: 1. Configure UFW (Firewall Setup) ---------------------------------------------------------- First, I used these commands to allow SSH access from my IP, enable the firewall, and verify its status: - sudo ufw allow from {your-ip-address} to any port 22 - sudo ufw enable - sudo ufw status verbose 2. Harden SSH -------------------------------------------------------- To improve security, I edited the SSH configuration file using: - sudo nano /etc/ssh/sshd_config Inside the file, i changed Port 22 to Port 2222 Changed PermitRootLogin yes to PermitRootLogin no Then I used these commands to allow the new port and apply the changes: - sudo ufw allow 2222 - sudo systemctl reload ssh 3. Restrict & Manage Ports -------------------------------------------------------- To open HTTPS and manage firewall rules, I used: - sudo ufw allow 443 - sudo ufw status numbered - sudo ufw delete <rule-number> 4. Enable Logging & Monitor Activity -------------------------------------------------------- To enable logging and monitor suspicious activity, I used: - sudo ufw logging on - sudo tail -f /var/log/ufw.log - sudo tail -f /var/log/auth.log
0
0
1-8 of 8

Suggested communities
Powered by