
Write something
Pinned

🔥
55m •
Amazon launches Claude Platform integration across AWS
AWS on Monday launched Claude Platform on AWS, the first cloud service offering Anthropic's native platform experience through existing AWS accounts. Full article: https://www.perplexity.ai/page/amazon-launches-claude-platfor-a9q7VY9BREeEn9HhW298jQ
1
0
Pinned
🔥
12h •
NotebookLM in 10 Bites: Convert Note to Source (6/10)
Bite 6 — Turn a Note into a Source So far, you have: ✅ Signed up ✅ Created a notebook ✅ Added a source ✅ Asked your first question ✅ Created your first output ✅ Saved useful notes Now we get to one of the most powerful features in NotebookLM. Today, we are going to turn a note into a source. This matters because once you start organizing and refining responses, you are no longer just working with the original document. You are starting to shape better information. You can capture those knowledge nuggets, clean them up, and move them into a source file that NotebookLM can use again. This is where things start to get really useful. Instead of only working from the raw material you started with, you can begin working from a more refined version of that material. That means NotebookLM is no longer just helping you read and summarize. It is helping you build better source material. 📝➡️📂 Note to a Source: Refine and reuse This feature lets you take the best parts of your work and turn them into new source material NotebookLM can build on. Now let’s use it. 👉 Start with a saved note Pick a note you created from a chat response or Studio output. Steps: ☐ Open your notebook ☐ Go to the Notes area in the Studio panel 👉 Turn the note into a source Steps: ☐ Select the note or select the 3-dot menu ☐ Choose the option to turn it into a source ☐ ☐ Confirm it now appears in your Sources panel That’s it. You just turned your own refined work into source material NotebookLM can use again. That is a big shift. You are no longer limited to the original document. You are now helping NotebookLM work from a cleaner, more organized layer of information that you helped create. This is one of the reasons NotebookLM becomes so powerful over time. You can start with messy information, refine it through chat and notes, and then turn those better insights back into a source. That creates a loop: Source → Chat → Notes → Better Source And that is where the real value starts to show up.
Pinned
🔥
12h •
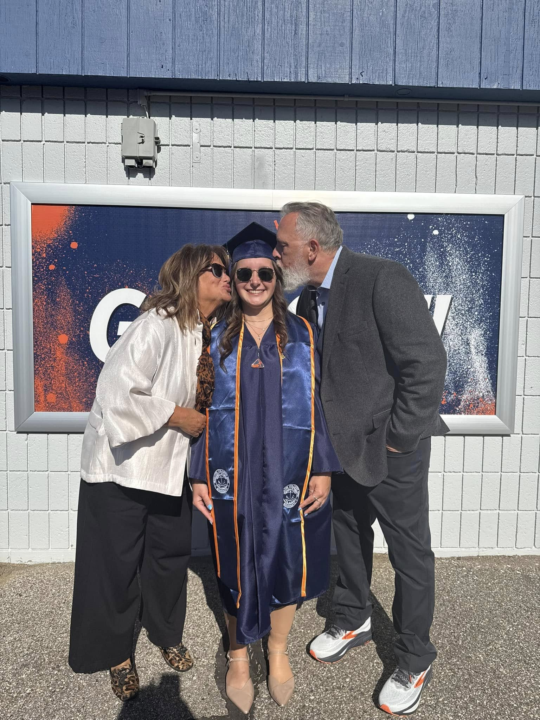
Been Away - Daughter Graduated from College
I’ve been a little quiet here the past few days for a very good reason. I was away watching my daughter graduate from college as a nurse and helping her pack up for the next stage of life. Proud girl dad moment, for sure. The good news is she already has a job lined up and is excited for what comes next. It is one of those moments where you realize how fast time moves, how much work goes into raising kids, and how rewarding it is to see them step into their own future. Back in the mix now and catching up. Grateful for this community, and also grateful for a few days focused on family.
🔥
2d •
NotebookLM in 10 Bites: Notes (5/10)
Bite 5 — Save What Matters So far, you have: ✅ Signed up ✅ Created a notebook ✅ Added a source ✅ Asked your first question ✅ Created your first output Now it is time to save the useful parts. Today, we are going to use Notes. This matters because good responses can get buried once you keep asking more questions or generating more outputs. Notes help you keep the best parts in one place. Instead of creating something useful and then losing it in the chat, you can save it, organize it, and build on it later. That is where NotebookLM starts becoming more than a question-and-answer tool. It starts becoming a workspace. 📝 Notes: Save what mattersNotes help you capture useful outputs so you can reuse, refine, and build on them later. Now let’s use it. 👉 Find something worth saving Go to a chat response or Studio output that you want to keep. Steps: ☐ Open your notebook ☐ Find a useful chat response or generated output ☐ Review it and decide what is worth keeping 👉 Save it to Notes Steps: ☐ Click Save to note ☐ Open the Notes area ☐ Review the saved note That’s it. You just saved a useful piece of work inside NotebookLM. This is a simple step, but it matters. Saved notes give you something to come back to. They also make it easier to organize your thinking and build better outputs over time. You do not need a lot of notes yet. For today, just save one or two things that seem useful. Today, you learned how to save useful information so it does not get lost. Tomorrow, we’ll build on this by turning a note into a source NotebookLM can work from again. From here, we’ll build on this. If you want to keep going, save a few different outputs and compare which ones are most useful to keep. Share what you save with the community.
🔥
3d •
NotebookLM in 10 Bites: Studio Panel (4/10)
Bite 4 — Understand the Interface: Studio Panel So far, you have: ✅ Signed up ✅ Created a notebook ✅ Added a source ✅ Asked your first question Now it is time to create something. Today, we are going to use the Studio panel. This is where NotebookLM starts turning your source material into usable outputs. 🧪 Studio: What it createsThis is where outputs live: summaries, notes, guides, and things like infographics. If the Sources panel is what you give NotebookLM, and the Chat panel is how you interact with it, the Studio panel is where NotebookLM gives something back in a more structured form. This is an important shift. You are no longer just reading or asking. You are now creating. Now let’s use it. 👉 Go to the Studio panel You should already have your notebook open with your source added. Steps: ☐ Open your notebook ☐ Go to the Studio panel 👉 Create your first output For today, create a simple infographic. Steps: ☐ Click Infographic ☐ Use the defaults ☐ Click Generate ☐ Review what it creates That’s it. You just used NotebookLM to turn source material into an output. This is where a lot of people start to see the value. Instead of just uploading information and asking questions, you are now turning that information into something more usable and easier to share. You do not need to worry yet about whether the infographic is perfect. The goal today is simply to understand what the Studio panel does. It creates something from the material you gave it. Today, you learned what the Studio panel is and how to create your first output. Tomorrow, we will build on this by looking at how to get more useful results from what NotebookLM creates. From here, we’ll build on this. If you want to keep going, try generating another output and compare what NotebookLM gives you. Share what you create with the community.
1-30 of 400
skool.com/ai-bits-and-pieces
To-the-point posts and single-thought AI lessons you can read in under 3 minutes and apply in everyday work and life.
Leaderboard (30-day)
1

+101
2

+27
3

+19
4

+18
5

+14
Powered by