Activity
Mon
Wed
Fri
Sun
Oct
Nov
Dec
Jan
Feb
Mar
Apr
May
Jun
Jul
Aug
Sep
What is this?
Less
More
Make it Match
281 members • Free
12 contributions to Make it Match

Jul 16 •
Booth ventilation - positive or negative pressure
I am getting started on building my paint booth. It will be modular, 12 x 24 ft, with 6 x 8 ft panels that will be fastened together. I've got a 5000 cfm exhaust fan, and was planning to use it to blow air into a plywood plenum, through a dozen intake filters, and then exhaust out the other end through exhaust filters. This will be inside my 40x50 shop that has heat and AC. It will pull conditioned shop air in, but I am uncertain if it can be just be exhausted through the exhaust filters into the shop, or if I need to make it a negative pressure booth, pulling air out and exhausting it outside. I was thinking of using zipwalls to allow me to enter/exit, and also for the truck parts to enter and exit. I would sure appreciate any info/recommendations anyone to help me figure this all out.
1 like • Jul 18
You definitely want to exhaust outside your shop. I have filters on my exhaust to catch the big stuff before the fans, but a lot still gets on the fans and goes out the window I use for exhaust. So, my booth is negative pressure, but that is less than ideal as it pulls in dust through every opening in the booth and whenever you open the door with the fans on. I sometimes wish I had added fans on the intake side to provide positive pressure in the booth to help with dust control.
Jul 12 •
Aftercooler for my air compressor
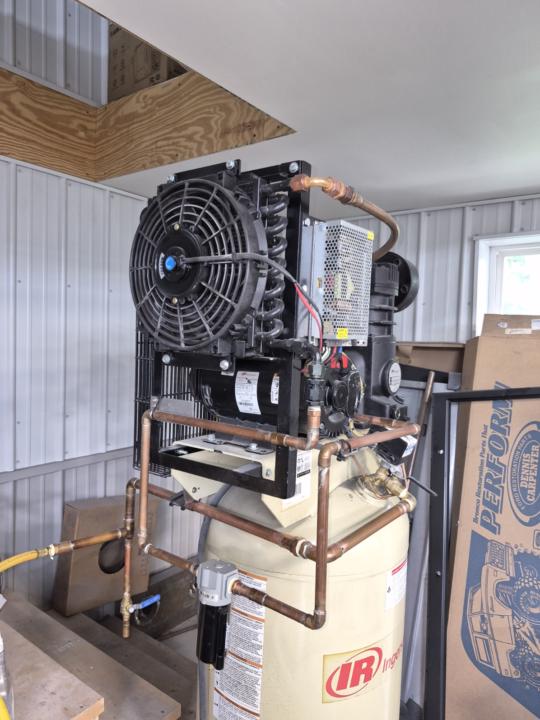
So after watching Aarons recent YouTube video on bone dry air, I decided to share a picture of my aftercooler setup that I recently finished. I used a 10 x10 transmission cooler with AN to NPT fitings to connect it to the copper lines. As you can see in the picture, I put a water separator at the lowest point to expel any accumulated water each time it runs. I used a transformer from Amazon to convert from 240V AC to 12V DC, pulling off the compressor supply, converting it to 12V, so now the fan cuts on whenever the compressor receives power. The temp of the cooler intake line runs over 250F, but coming out of the cooler is only 84 degrees, and by the time it gets back to the tank, is about 75F. After 2-3 days of running here in NE Tennessee, I drained the tank and only got 1 oz of water out of it. I hope this helps someone.
1 like • Jul 18
That should be very effective. For anyone wanting a simpler and passive system, you can also just make a serpentine run of copper air lines and it will do the same without need for electricity. My shop is fairly large, 32x48 so I simply ran my 3/4” air lines near the 14’ high ceiling. My paint booth is at the opposite corner from my compressor. I ran a 3/4” loop around the perimeter of my shop and then ran 3/4” drops in 4 places where I needed air. I put a drain stub at each drop so I can drain water there, but I’ve yet to have any water at any drop. My compressor exits to a filter and water separator and regulator combination unit and I get a little moisture there, but very little. After the air climbs 12’ up to my copper loop, travels nearly 80’ to my paint booth drop and then down the 10’ long drop, the air is basically at ambient temperature and very dry. Obviously, if your compressor is right outside your paint booth, then you need a more advanced cooling system such as you built or you need a refrigerated drying unit or several vertical copper pipes in serpentine form.

Jun 30 •
Has anyone here sprayed single-stage metallic?
A friend of mine on the other side of Finland is doing a nut-and-bolt restoration of an early ‘70s Opel Diplomat. He chose to paint the car with Tikkurila Temadur 90, an industrial 2K polyurethane that’s a single-stage silver metallic. He’s not happy with the result, mainly because of tiger striping. From what I’ve been able to find, he used a generic, inexpensive thinner that appears to have been a fast thinner. He also sprayed the car with a sub-$100 bottom-feed spray gun (probably not ideal! 🤣). He knows I’ve been trying to learn automotive painting and has invited me to respray the car. I plan to use an Iwata WS-400 Series 2.1 Clear gun with either a 1.3 HD or 1.4 HD setup. I’ll spray a number of test panels in my shop before driving over to paint the car. I’ve already picked up some slow thinner for the test panels, as I think it may help reduce tiger striping, especially since it’s a relatively large car. Any advice would be greatly appreciated! I’ve only sprayed one complete car before, and that was more than 30 years ago. The doors will be installed, but the hood, trunk lid, and sunroof will be sprayed separately on stands.

1 like • Jul 10
I have not sprayed single stage metallic, but I am spraying a single stage 2K white aviation paint and Axalta recommends applying two medium wet cross coats to avoid tiger striping even with the plain old white paint. Cross coats are a pain on some shapes, but that might be worth trying on a test panel.

Jun 21 •
Guitar builder looking to learn
Hi, I'm Dan I recently found your excellent youtube channel when searching for information on how to properly paint with automotive urethane. I'm a guitar builder, switching from nitrocellulose to these auto paints, quite a different animal! Currently experimenting with Tamco stuff, setting up a proper spray booth/and gear.
1 like • Jun 23
@Green machine Otranto What is the recoat window for your base? Two days is stretching it for many paints. Did you sand prior to clear? If you exceeded the recoat window and didn’t sand, that might also contribute to the orange peel, but I don’t think that would cause the bubbles. Those are probably from applying too thick a coat such that the surface skinned before the solvent from the clear was adequately released. It definitely is worth doing the calculation based on the coverage in the TDS. My Axalta paint says something like 600 square feet of coverage at 1 mil DFT. That is 600/128 =4.688 square feet per ounce. I think you said you sprayed 1.5 oz which would cover 7 square feet at my Axalta coverage. That would probably paint 3 guitar bodies. Then again, if your paint coverage is listed as 300 square feet per gallon, your application rate might be right on. Worth reading the TDS, doing the calculation and then spraying a test panel or two to check. I was spraying mine too heavy at first and got solvent pops and more orange peel than I like. Once I got my application rate better calibrated, my test panel finish looked much better. I used two 2x2’ test panels so I had exactly 8 square feet. I added a couple extra square feet to account for the overspray at the end of each pass and mixed paint for 10 square feet and that came out nearly spot on. Definitely worth the cost of a couple of sheets of aluminum in my case, but I would try to get test panels of similar material to what you are painting and practice on them to get things right before painting the actual item. Edit: Note that I masked off each coat so I could measure the DFT of the layers as applied. The left-most green stripe is the epoxy pretreatment required for aluminum. The gray stripe is the epoxy primer/sealer on top of the pretreatment. And the white is all three layers (1 coat pretreatment, 1 coat primer and two coats of single stage color) as they will be on the actual airplane.
1 like • Jun 24
@Green machine Otranto I’m guessing here, but the cold temps likely are slowing the solvent release speed dramatically. The skinning of the clear should also be slower at cold temps, but if the solvent release is slowed more than the skin time, that might be a contributing factor. I would also be a little concerned about your rapid application speed. If you are moving the gun fast, and especially if you have a slow fluid rate and are holding the tip more than 6” from the surface, the paint droplets may be skinning while in transit to the surface and not merging together well on the surface. This might be trapping air in the paint somewhat like putting a couple of layers of small marbles on a flat surface will have air pockets between the marbles. And if you are using high air pressure, that could make it even worse. I would think about trying the following: 1. Heat both paint and guitar body if possible before moving into the cool paint booth. 2. Use a little extra reducer. 3. Use the gun pressure the manufacturer recommends (my guns are 28 psi for my full size gun and 29 psi for my small spot repair gun if memory serves) 4. Hold the gun 6” or less from the surface. 5. Slow your speed so that the paint droplets meld together well and don’t appear dry at all upon application. 6. Experiment with overlap if the TDS doesn’t give a recommendation. My single stage paint suggests 50% overlap and speed so as to provide a medium wet coat. However, often clears will suggest much more overlap, up to 80% in some cases. This is where have a few test panels helps a lot as you can start the top of a panel with faster speed and more overlap and then slow your speed and lessen the overlap at the bottom of the test panel. That allows you to compare the results side by side and see if there is a sweet spot.
Jun 23 •
Sealer section in Skool course
Is this an error? Water making the paper produce shallower scratches should make it act like a higher/finer grit, right? Yet the bullets below seem to say the opposite. If water makes the paper produce shallower scratches shouldn’t wet 400 product shallower scratches more like dry 600? Am I reading it wrong? Water lubricates the paper and produces shallower scratches than dry sanding at the same grit. Wet P600 lands in roughly the same place as dry P400. - Dry sanding before sealer: P400 - Wet sanding before sealer: P600 Same final result, but the path to get there is a little bit different.
1 like • Jun 23
@Aaron Jokela I was pretty sure I knew what you meant as that has been my wet sanding experience also, but when I read the bullets my incongruity sensor went off.
1-10 of 12
@matthew-whiting-4598
I am a fairly inexperienced painter and am about to paint a homebuilt airplane that I am in the final stages of building.
Active 6d ago
Joined May 30, 2026
Powered by