
Write something

🔥
10d •
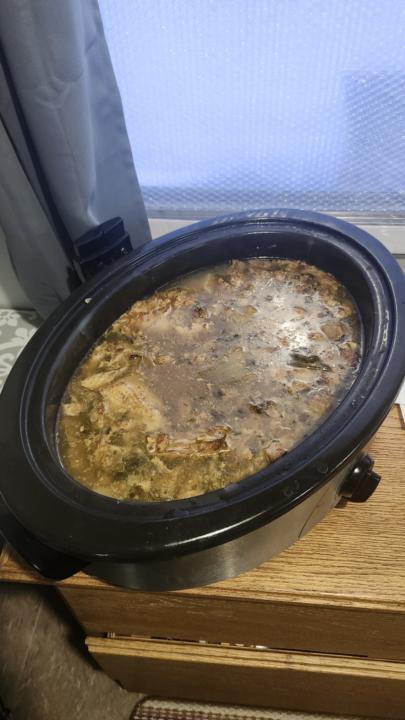
Bone Broth Quick Guide.
A while ago I posted a picture of some bone broth we had in the works. This morning I thought I would share a quick step by step on how to make it. First, in order to make bone broth, you'll need bones. Chicken bones, Beef bones, Deer Bones, doesn't matter. What does matter is that they have a) not been chewed on by whoever ate the meat. b) they haven't been from a dish that had a seasoning sauce used. A few dry spices is ok, but sauces tend to impart a strong flavor to the broth. This unwanted flavor limits what you can do with said broth. Next, for extra nutrition, you'll want to add some vegetables. We usually add some chopped onion, some chopped celery, and diced carrots. Toss in a couple bay leaves, and approximately 2 ounces of vinegar. As the broth does its cooking thing, most of the vitamins and minerals from the vegetables will cook out and stay in your broth. Next you'll need a large electric roaster or slow cooker with temperature control. put your bones, veggies, and bay leaves in the roaster or slow cooker and cover with water. Add the 2 ounces of vinegar. Set the roaster or slow cooker to 200 - 250 deg F and let it cook/simmer for 24 hours. ** Note** depending on what type of bones you've used, this cooking period may have a portion of time where the mixture has an odd smell... this is normal and it will go away as the bones cook down. Trust me, as it cooks it'll start to smell so so good. After the 24 hours has passed, turn the heat off and let the broth cool to room temperature. Strain the bones, veggies, and bay leaf mixture to remove the broth. You can toss this once the broth is removed, it's not worth keeping. You're done! If you plan on using the broth right away you can put it into jars and store in the refrigerator. For longer storage, you'll want to preserve it using a pressure canning method or freeze it. Should you choose to freeze it, remember to leave some space in the container to account for expansion as the broth get solid.
🔥
10d •
Easy Peasy Squeezy Cheese
I call this Easy Peasy Squeezy (or spreadable) Cheese If you're a cheese lover, this simple, basic, 2 ingredient cheese recipe will be a hit for sure. It's a flexible and affordable option to those expensive store-bought brands. To get started, you'll need a few tools: Cheesecloth or lint-free cotton cloth 1 medium to large-sized strainer/sieve 1 large pot capable of holding 1 Gallon / 4L of liquid 1 large bowl capable of the same capacity as the pot. 1 wooden spoon for stirring A thermometer capable of at least 150 Deg Fahrenheit, a candy thermometer is ideal for this. A 3/4 cup measuring cup 4 wooden or plastic clothespins Jars for saving the whey For ingredients you'll need: 1 Gallon / 4L Jug of 3.25% milk or raw milk 3/4 cup 5% white vinegar. Your choice of herbs and spices. To make the cheese, follow these seven steps: Step 1 – Place the large pot and milk on the stove & bring slowly to a temperature of 120 degrees Fahrenheit, use low to medium heat. Stir constantly to avoid scorching milk. Step 2 – When milk has reached 120 Degrees Fahrenheit, remove from heat. Step 3 – Gently stir in 3/4 cup of 5% white vinegar. Let it sit for 30 minutes off the burner. Step 4 – Place a strainer or sieve in/over a large bowl and place a lint free cotton cloth, or cheesecloth in the strainer or sieve and hold in place with clothespins. Step 5 – Strain pot contents through the cloth/cheese cloth and strainer to separate whey from curds. Step 6 – Let the mixture sit until the whey stops dripping from the sieve/strainer. Bonus Whey tips at the end of the recipe. For thicker or firmer cheese, you can squeeze out more whey by hand. Step 7- When your cheese reaches the consistency or firmness you want, place it in a smaller bowl and mix in herbs and spices to taste. Let it stand in the refrigerator for 24 hours for the best flavor. Bonus tip: Save the whey! You can use the whey: - In pancakes - In soups - You can water your plants with it - If done with raw whole milk, you can try reheating the whey, add more vinegar, & repeat for more cheese! -
🔥
9d •
Memere's (Grandma's) Macaroni Goulash
In an earlier post, I mentioned that we'd be sharing a recipe for Macaroni Goulash. Well, here it is! This four-ingredient family favourite is simple to prepare and can feed a family of four. To make this dish, you'll need: - 1 pound ( 454 grams) ground beef. We use medium ground but any grind works. - 1 796 ml can of Italian Spiced diced tomatoes - 2 cups macaroni - 1 medium white or yellow onion, chopped. - 1 large frying pan - 1 pot for cooking the macaroni The Process Step 1 - Fry the ground beef until cooked. Drain off as much of the fat as possible, but do not strain or rinse. Set frying pan off to the side. Step 2 - Cook 2 cups of macaroni until the desired firmness is reached. Note that if cooking El Dente, the macaroni may not enlarge fully, and an extra cup of macaroni may be required. Drain the macaroni and add to ground beef. Step 3 - Add the chopped medium onion and can of Italian Spiced diced tomatoes to the macaroni and ground beef mixture. Mix well. Step 4 - place frying pan back over medium heat and bring to a simmer. Let the mixture simmer until the onions start to soften. This should be approximately 15-20 minutes. Step 5 - Remove from heat, add any additional salt, pepper, or extra Italian spices to taste and serve. To add to the flavour or change it up, this dish can be topped with grated Parmesan Cheese, or you can stir in a teaspoon or tablespoon of sour cream to taste. There you have it, Memere's ( Grandma's) Macaroni Goulash, from our family to yours. Let us know in the comments what you think 🙂 We hope you enjoy it as much as we do!
2
0
1-3 of 3
powered by

skool.com/the-pennywise-pantry-5772
Grocery bills out of control? Join us & learn how to shop smarter, cut food waste, & save on food by much more than your monthly membership.
Suggested communities
Powered by