
Write something

Feb '24 •
Exposure ✨
There are some settings in the camera app that you should keep in mind while you are shooting. One of the main components of good photography is exposure. Exposure is the amount of light that reaches your camera’s sensor. Without the right balance of exposure, your photo can be washed out with too much light or have too many shadows. For some reason, iPhones like to have the exposure slightly high in the automatic settings. I want to show you why it is beneficial to have the exposure at a little lower than default. 1. Preserves Details - Lower exposure helps preserve details in both highlights and shadows, resulting in a more balanced and dynamic image. By avoiding overexposure, you retain information in bright areas such as the sky or reflective surfaces, preventing them from appearing washed out or losing texture. When the exposure is too high, the sky and other bright areas will simply be white light without any detail at all. 2. Enhance Colors - Lower exposure can enhance color saturation and richness. By properly exposing the image, colors appear more vibrant and true to life, capturing the essence of the scene more accurately. This is especially crucial in landscape and nature photography, where vibrant colors often play a significant role in conveying mood and atmosphere. 3. Reduces Noise - Maintaining lower exposure also reduces the risk of noise in the final image, particularly in low-light conditions. Higher exposure settings can introduce digital noise, which degrades image quality and detracts from the overall aesthetic appeal. By opting for lower exposure, photographers can produce cleaner and sharper images, particularly when shooting in challenging lighting situations. 4. Easier Editing - Lower exposure allows for greater creative control during post-processing. With a well-exposed image, photographers have more flexibility to adjust brightness, contrast, and other parameters without sacrificing image quality. This flexibility opens up a world of possibilities for fine-tuning the final look of the photograph to match the photographer's artistic vision.
2
0
Feb '24 •
iPhone Camera Settings
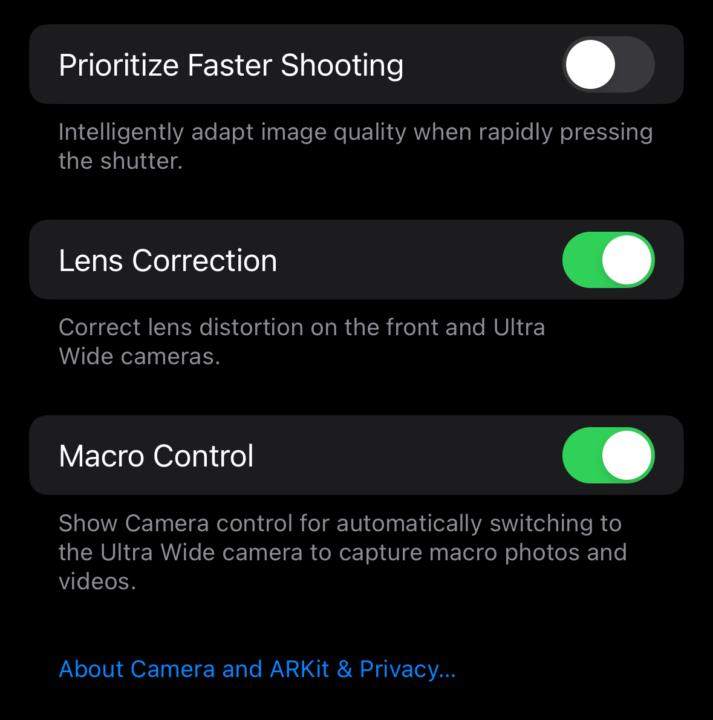
One of the first things you need to do is make sure you have the right camera setting on your iPhone. Before we go over these settings, if your iPhone doesn’t have these, they’re not necessary to take amazing photos, but they can help. And if any of you have any questions, feel free to post them in the “Questions” Discussion. (We’ll skip the video settings for now and go straight to photo settings.) First, let’s go over “Formats.” Go to Settings > Camera > Formats Once you’re in formats, make sure you are in “High Efficiency” mode. This will allow you to shoot cinematic, 4k at 60 fps, and HDR. Moving down the screen, if you have an iPhone that allows to shoot in ProRAW, make sure you have this on. And also put the Pro default to “ProRAW Max.” The last section is “Video Capture.” Allow for Apple ProRes. This lets you have more a more professional look in post-production. Next up is “Preserve Settings.” Go to Settings > Camera > Preserve Settings Each setting allows you to make your favorite settings automatically used when you first open up the camera app; otherwise the app goes to it’s default settings. This is more of a personal preference, but I would recommend at least putting “Macro Control” on. For iPhones that are newer, they have a macro feature that allows for close up shots, but without this setting on, the iPhone chooses when it wants to use the macro feature. I would also recommend putting “ProRAW & Resolution Control” on. This makes sure that you’re using ProRAW every time you go to your camera without needing to make sure it’s on. And lastly, I would have “Apple ProRes” on. The rest of the settings in this group is also preference, so you can decide what you want. We’ll skip down to the “Composition” section next. “Composition” To help with better composition, turn on the “Grid” setting. This puts the lines on your preview so you can have a better idea of where your thirds are. I also like using the “Level” setting. This helps with keeping horizons straight, so there’s less work to do in editing.
2
0
1-2 of 2

skool.com/independence-1826
Learning tips and tricks to get amazing photos with just your phone
Leaderboard (30-day)
1

🔥
+2
2

+1
Powered by