Activity
Mon
Wed
Fri
Sun
Aug
Sep
Oct
Nov
Dec
Jan
Feb
Mar
Apr
May
Jun
Jul
What is this?
Less
More
Owned by Aussie
Aussie cyber pro with hands-on home lab builder sharing SOC ops, pentesting labs, playbooks & cert prep. Level up your blue-team game Down Under!
Memberships
Skoolaroos
217 members • Free
AI Cyber Value Creators
8.8k members • $47
Cyber Hub | Empirical Training
13.7k members • Free
AI Academy
2.8k members • $9/month
AI Automation Society
426.2k members • Free
MyFirstHack | Cybersecurity
93.2k members • $9/month
Skoolers
164.3k members • Free
39 contributions to Cybersecurity BootCamp

Apr 22 •
🛡️ IR Playbook — Responding to a CVSS 9.1 RCE in an Enterprise ERP (CVE-2026-0498 SAP S/4HANA)
As mentioned in this week's check-ins, I've been building out a real defender's response playbook for CVE-2026-0498. Here it is in full. Save this one — this is the kind of scenario you will face in a real SOC or IR role. ―――――――――――――――――――― 📋 VULNERABILITY BRIEF ―――――――――――――――――――― CVE: CVE-2026-0498 SAP Security Note: #3694242 Product: SAP S/4HANA (Private Cloud and On-Premise) Affected Versions: S4CORE 102 through 109 CVSS Score: 9.1 (Critical) CWE: CWE-94 — Improper Control of Generation of Code Published: 13 January 2026 (SAP Patch Day) What it does: A vulnerable Remote Function Call (RFC)-exposed function module in SAP S/4HANA allows an attacker with administrative privileges to inject arbitrary ABAP code or OS commands directly into the system — bypassing authorization checks entirely. This effectively creates a persistent backdoor with the ability to fully compromise the host system, impacting confidentiality, integrity, and availability. Onapsis researchers confirmed the function module allows modification of existing program source code without authentication enforcement. In plain English: An admin-level attacker can rewrite SAP application code and execute OS commands on the underlying server. Full system compromise. No guardrails. ――――――――――――――――――――――――――― ⚠️ WHY THIS IS HARDER THAN A TYPICAL RCE ――――――――――――――――――――――――――― Most RCE vulns sit at the perimeter. This one lives inside your ERP — the system that runs payroll, procurement, financials, and supply chain. It requires admin-level access, which means: - The attacker already has a foothold AND elevated privileges - Lateral movement has already occurred before this vuln is exploited - The blast radius is your entire business operation, not just an endpoint - ERP systems are often poorly monitored compared to traditional IT infrastructure - ABAP code changes are hard to detect without specific tooling or change management controls This is not a "patch and move on" scenario. This is a "assume breach, investigate thoroughly" scenario.
1
0
Apr 22 •
🔥 Thursday Push — One Day to Make the Week Count
G'day legends! Thursday morning — and this is where it gets real. 🔐 Friday is tomorrow. Whatever you said you'd get done this week, today is your last real shot at it. No pressure — but also, a little pressure. That's the point. 😄 I'll go first: Today I'm finalising the CVE-2026-0498 defender's playbook for the Classroom — covering patch validation steps, privilege audit procedures, and what an IR plan looks like when a CVSS 9.1 hits your ERP environment. Aiming to have it published before end of day. Also reviewing the 2 membership requests that came in overnight — great to see the community growing. Welcome to anyone who just joined! 👋 Your Thursday challenge — answer ONE of these below: 🔥 What's the ONE thing you're committing to getting done today? 📚 What's one concept or tool you've learned this week that actually clicked? 🚨 Got a question you've been putting off asking? Today's the day — drop it below and let's get it answered before the week ends. Thursday is the unsung hero of the week. Most people coast. Don't be most people. Let's finish strong. 💪 — @Aussie Mr Cyber
Apr 22 •
⚡ Wednesday Check-In — Halfway There. How's the Week Looking?
G'day legends! Wednesday check-in — we're smack in the middle of the week, and it's the perfect time to take stock. 🔐 Monday set the intention. Now let's see what's actually happened. I'll go first: This week I've been deep in the CVE-2026-0498 SAP S/4HANA response walkthrough — putting together a real defender's playbook for a CVSS 9.1 RCE vulnerability in an enterprise ERP environment. It's the kind of scenario that doesn't get enough airtime in training but shows up constantly in real SOC work. Should be ready to drop in the classroom by end of week. Also been watching the leaderboard closely — shoutout to Jonathan Ingram, Max Allen, and Abdelrahman Hamdy for being active this week. That's the energy. 🙌 Your turn — drop a comment below: ✅ What have you actually done this week so far? 🧱 Where are you stuck or behind? 🎯 What's your ONE focus for tomorrow and Friday? No judgement here — whether you smashed it or the week got away from you, drop in and let's finish strong together. Two days left. Make them count. 💪 — @Aussie Mr Cyber
1
0
Apr 21 •
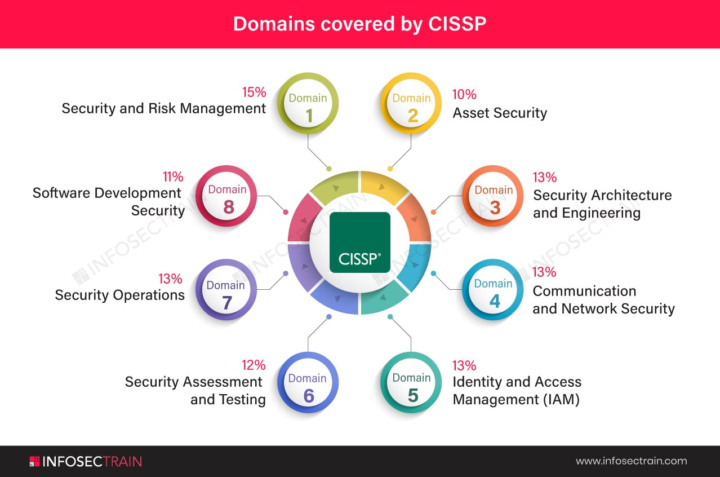
CISSP prep check — where are you at?
Dropping this for everyone in the bootcamp who's working toward their CISSP right now. No matter what stage you're at — pick your level below: 🔵 Just started — still wrapping my head around the 8 domains 🟡 Halfway through — deep in the study grind 🟠 Final stretch — doing practice exams and praying 😂 🟢 Recently passed — and I have tips to share! Comment your colour + your biggest struggle or win so far. If you've passed the CISSP — drop your #1 tip for those still grinding. The community needs you! 🙌🛡️
2
0
Apr 20 •
🔐 TUESDAY CHECK-IN — Let's Go, Cyber Crew! 🔐
Happy Tuesday, everyone! 💻🔥 We're midway through the week and I want to know — how are you showing up TODAY? Drop your answers below 👇 1️⃣ Where are you in the bootcamp right now? (Module, topic, or concept you're currently tackling) 2️⃣ What's ONE thing you learned this week that surprised you? 3️⃣ What are you stuck on or struggling with? (No shame — we ALL get stuck. That's why we're here!) 4️⃣ What's your goal before Friday? Remember — cybersecurity isn't learned passively. Every lab you run, every concept you break down, every question you ask is leveling you up. 🛡️ The hackers aren't taking days off. Neither are we. 😤💪 Let's check in, support each other, and finish this week STRONG. 🚀
0 likes • Apr 21
@M Darden-smith I am on AEST here
1-10 of 39

@pat-hawkins-2854
Aussie cyber pro hands-on home lab builder sharing SOC ops, pentesting labs, forensics playbooks & cert prep. Level up your blue-team game Down Under!
Active 14h ago
Joined Jan 1, 2026
Sydney Australia
Powered by