Activity
Mon
Wed
Fri
Sun
Aug
Sep
Oct
Nov
Dec
Jan
Feb
Mar
Apr
May
Jun
Jul
What is this?
Less
More
Owned by Woody
Join a community of YouTubers turning small channels into real income, together, with proven strategies that work! 💪
Memberships
Skoolers
165.9k members • Free
ᗷᑌㄒƬEᖇ 🧈⭐️💛🍯⚠️
69 members • $69,420/month
228 contributions to NewTubers YouTube Skool

7d •
FREE YouTube Training this Tuesday July 7th
Hey NewTubers! This Tuesday July 7th at 8:00PM EST / 7:00PM CST I’ll be giving a YouTube Training presentation to @Christine Howatt‘s community, the Retirement Pocket Cash Club. During this training we will cover: - How to find your YouTube niche - The most common YouTube video formats and how to pick the right one for your personality and content style - A simple repeatable process for taking a video from idea all the way to published - How to use AI to speed up your workflow without losing the human touch that actually makes people watch - Getting into the YouTube Partner Program to earn ad revenue, how long it actually takes, and what the numbers mean - How to make money through YouTube before you ever qualify for ad revenue through the YPP - The key analytics that tell you what is working and what to fix - And more! If you aren’t already a part of Christine’s community, you can join for free using this link (FYI This is my affiliate link so I may earn a commission if you decide to upgrade to her Premium plan) The training is completely free for all her community members. We hope to see you there this Tuesday night!! —Woody

0 likes • 5d
@Natalie Cogdell I have a feeling @Christine Howatt will approve it in time! 😉
0 likes • 3d
@Stephanie Wilson I will share a link to the replay as soon as it’s up!
4d •
Posting 30 Days Straight
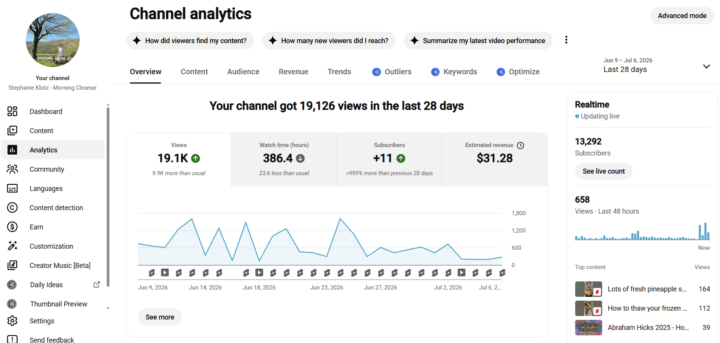
I'm starting to get good at having content come out every day. I have been doing a lot of shorts, think I will add more long form content in the next few weeks. I started doing this almost 30 days ago to see if this will boost my channel. Not sure I am seeing anything yet. I will update you in 30 more days! 😀
1 like • 4d
It’s great that you’re being consistent!! Some videos don’t really see traction for a while so I say keep building this foundation and watch it snowball soon!
4d •
Tonight! Live YouTube Training
I’ll be giving a YouTube training class to @Christine Howatt’s community at 8PM EST / 7PM CST. You can join Retirement Pocket Cash Club for free by clicking here, and then the training will be free to attend!
5
0


🔥
11d •
New Youtube Video! ⭐
This is my 3rd video, for now I'm reusing my old Skool posts for video ideas. My videos are usually about "Community Building" and this one is about what make a Community an actual community, and not just a group. Thank you @Woody Hill for letting me share it! 🔥
1 like • 7d
Thanks for sharing this video Paul!
1 like • 5d
@Paul Sirvinskas

1 like • 7d
Nice!!
2 likes • 7d
@Janay Trevillion 🙌
1-10 of 228

@woody-hill-1331
YouTube coach for new YouTubers and business owners. Free YouTube Course at NewtubersSkoolCourse.com
Active 1h ago
Joined Aug 19, 2025