Activity
Mon
Wed
Fri
Sun
Mar
Apr
May
Jun
Jul
Aug
Sep
Oct
Nov
Dec
Jan
Feb
What is this?
Less
More
Memberships
JavaScript
324 members • $1
Dev Skool Community
1.1k members • Free
9 contributions to Dev Skool Community

Nov '25 •
How are you currently trying to land a better tech job?
Also write a comment regarding your job search experience so far!
Poll
15 members have voted

1 like • Nov '25
@ Alex Pantaleev, networking works more than applying for Jobs, because I'm the living example: I have got every job through Networking Only.
0 likes • Nov '25
@Alex Pantaleev, it's been almost four years now.
Oct '25 •
Boost Your Website Performance with Critical Rendering Path Optimization!
Is your website loading slowly and hurting user experience or conversions? Let’s fix that with Critical Rendering Path (CRP) optimization! Here are the 5 key steps in the CRP process: 1. HTML Parsing: Browser fetches and parses the HTML, building the DOM structure. 2. CSS Parsing: Linked CSS is fetched, parsed, and applied to the DOM. 3. Render Tree Construction – Browser creates a visual tree (excluding non-visual elements). 4. Layout (Reflow) – Calculates positions and sizes of elements on the page. 5. Painting – Pixels are rendered on the screen with colors, styles, and textures. Why it matters: - Faster load times = better user experience - Improved SEO rankings - Higher conversions & engagement Start optimizing your Critical Rendering Path today and supercharge your website performance!
2 likes • Oct '25
Hi @Vikas Dalal, yes, In React, you can optimize the Critical Rendering Path by: 1. Using code-splitting & lazy loading to reduce bundle size. 2. Leveraging SSR/SSG (Next.js) for faster initial render. 3. Inlining critical CSS & lazy loading images. 4. Preloading key assets and minimizing re-renders. These steps help React apps load and render much faster.
Oct '25 •
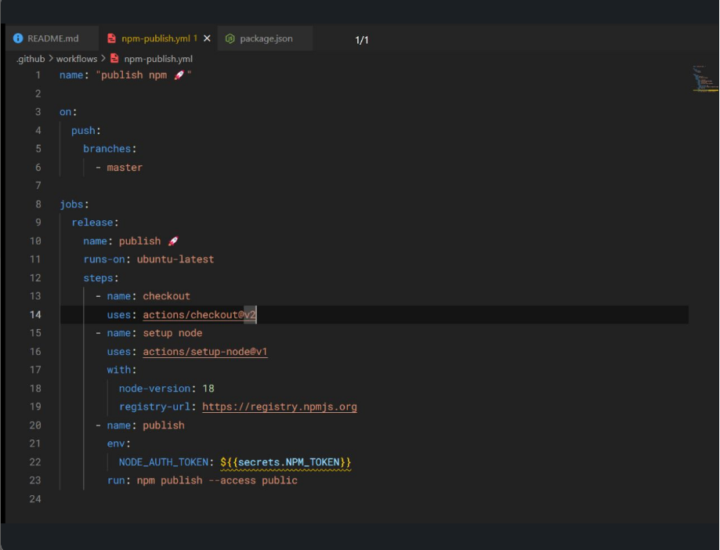
Automating CI/CD to Publish Your First npm Package Using GitHub Actions
Step-by-Step Guide: 1. Initialize a new React + Vite project. 2. Clean up unnecessary folders (src, public, assets). 3. Update your package.json (name, author, license, repo) 4. Set up GitHub Actions → .github/workflows/publish-npm.yml. 5. Create an npm access token → add it as a GitHub secret (NPM_TOKEN). 6. Run npm login locally. 7. Push your code to GitHub. 8. Watch your GitHub Actions build and publish your package to npm automatically! And that’s how you publish your first npm package effortlessly!

May '25 •
Extensions
Hello all, what are (in your opinion), the most used extensions or the ones you use the most (doesn't matter if it is for VSCode or another IDE, just post them there)?
1 like • Oct '25
mostly use ESLint, Prettier, ES7+ React Snippets, GitLens, Error Lens, Tailwind CSS IntelliSense, and Thunder Client my go-to setup for React dev .
Sep '25 •
State Management
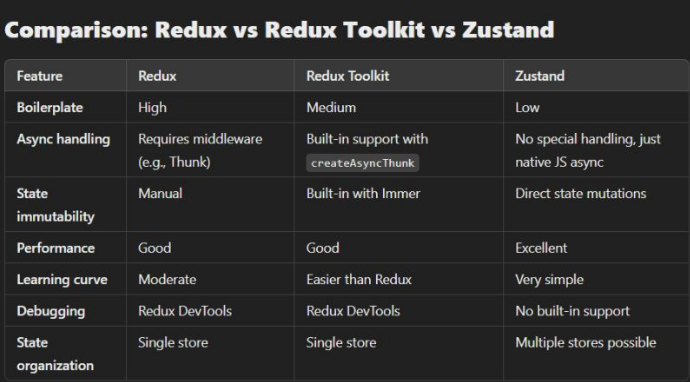
Exploring the evolution of state management in React: from Redux's complexity to Redux Toolkit's simplicity, and how zustand offers an even lighter, minimalist approach for modern applications. when to use each? redux: Use it when you need a highly structured state management solution, especially in larger apps with complex data flows. Redux Toolkit: best for those who prefer Redux but want to avoid the verbosity and boilerplate. great for teams starting new projects. zustand: Ideal for small to medium-sized projects where simplicity and performance are key. It’s a great choice when Redux feels like overkill.
1 like • Oct '25
Great question, @Gustavo Sartori Pereira Almeida. A few key anti-patterns to avoid in Zustand 1. Storing non-reactive data in the store 2. Overusing selectors can cause unnecessary re-renders 3. Mixing UI logic inside the store 4. Forgetting to keep the store lean and focused on the state, not side effects
1-9 of 9

Active 71d ago
Joined Jul 29, 2025
Powered by