Nov '24 • General discussion
Penimaster PRO Detailed User Review: Packages and Usage
➡️Get 25% OFF your Penimaster PRO purchase by using this discount link https://geni.us/penimaster
- Rod Extender(https://geni.us/penimaster-rod): Describe the classic rod-based system
- Belt Extender(https://geni.us/penimaster-belt): Highlight the belt attachment's flexibility, which allows users to wear the extender discreetly under clothing.
- Complete Set(https://geni.us/penimaster): Detail the advantages of the complete package, which combines the rod, belt, and weight extenders. This set offers versatility, allowing users to switch between different methods depending on their comfort level and routine.
- Weight Extender: Focus on the weight-based extender, which utilizes gravity to apply downward force. It’s particularly suitable for those interested in gradual stretching without the constant adjustments typical of rod extenders.
➡️Technology
Explain the unique technology of Penimaster PRO, specifically the vacuum and adhesion-based mechanism. Discuss how the vacuum effect helps to secure the device while minimizing slippage and discomfort, crucial for long-term wear.
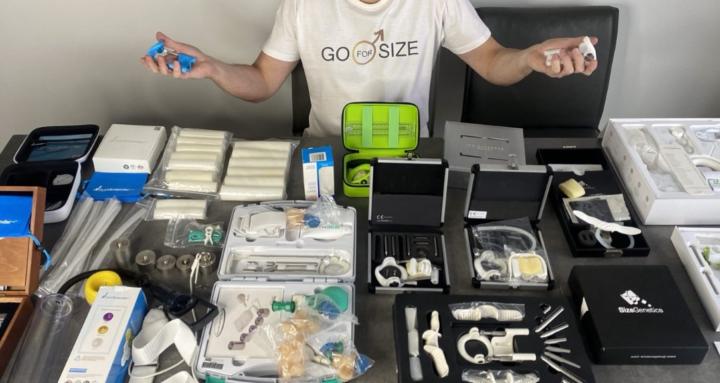
➡️Accessories and Spare Parts
List common accessories available with each package, such as comfort pads, tension springs, protective caps, and support straps. Include spare parts that users can replace over time, like vacuum seals and adhesion diaphragms, which ensure the extender remains functional and comfortable.
➡️Differences Between Packages
Outline the main differences in terms of comfort, wearability, and targeted results. The rod extender(https://geni.us/penimaster-rod) may be suitable for stationary use, while the belt extender(https://geni.us/penimaster-belt) offers more mobility. Weigh the pros and cons of each package, helping readers decide which package aligns best with their lifestyle.
➡️Click here to order one Penimaster PRO package with a 25% Discount https://geni.us/penimaster
➡️Ordering Process
Guide readers through the ordering process, including direct orders from Penimaster’s official website https://geni.us/penimaster. Explain the importance of choosing authentic sources to ensure product quality and access to customer support.
➡️How to Save Money
Mention available discount options, including:
- Sign up for newsletters to receive exclusive promotions.
- Seasonal sales or bundle offers on the complete set.
- Any referral programs or loyalty points, if available.
Pros and Cons
- Pros: Detail advantages such as the quality build, customizable options, versatility of the complete set, and the medical-grade materials used.
- Cons: Mention the initial learning curve, the necessity of regular maintenance, and the potentially higher cost compared to simpler extenders.
➡️Medical Facts on Vacuum Extenders
Discuss the medical basis for vacuum extenders, including how gentle, consistent pressure promotes cellular expansion and helps with curvature. Add references to studies on vacuum-based extenders and their general safety and efficacy.
How to Use the PeniMaster PRO: Step-by-Step Guide
➡️1. Preparing the Device
- Inspect the Parts: Before starting, make sure all components are present and in good condition. This includes the base ring, extension rods (for rod-based models), belt (for belt-based models), sluice, and adhesive diaphragm.
- Clean the Device: Clean each part with warm water and a gentle, non-abrasive soap to ensure hygiene. Make sure all parts are completely dry before assembling.
- Assemble the Device: Follow the manufacturer’s instructions to attach the components securely. For example, insert the diaphragm and the sluice into the chamber.
➡️Applying the Device
- Preparing the Sluice and Diaphragm: Apply a small amount of lubricant to the interior of the diaphragm and sluice, as this minimizes friction and ensures a comfortable fit. Avoid using excessive amounts, as it may affect the vacuum seal.
- Inserting the Glans: Insert the glans (head of the male organ) gently into the diaphragm chamber. Hold the base of the sluice while creating a vacuum by gently squeezing the air out of the chamber.
- Creating the Vacuum: Use the hand pump to create a vacuum seal around the glans. This seal should be tight enough to hold the organ firmly without discomfort. Adjust the vacuum strength as needed.
➡️Adjusting the Traction (Rod-Based Model)
- Choose Your Rod Length: For users with the rod extender model, select the appropriate length of extension rods based on your current size and experience level. Beginners should start with shorter rods and gradually progress to longer ones.
- Setting the Tension: Attach the rods to the base ring, then connect the glans chamber to the rod system. Adjust the rods until you feel a gentle yet firm stretch. This traction force encourages tissue adaptation without causing pain or discomfort.
➡️Adjusting the Belt (Belt-Based Model)
- Position the Belt: For users with the belt model, position the belt around your waist, thigh, or shoulder, depending on your preference and comfort.
- Adjust the Tension: Connect the belt to the glans chamber and adjust the length of the belt until you feel a consistent stretch. Adjustments should be gradual and comfortable, with no sharp tension.
➡️Wearing Time and Comfort Adjustments
- Start with Short Sessions: For beginners, start with 1 to 2 hours a day, gradually increasing wear time as you get accustomed to the device.
- Breaks and Monitoring: Every 1-2 hours, take a short break to check the glans and ensure there is no excessive redness or irritation.
- Gradually Increase Wear Time: Once comfortable, aim for 4-6 hours per day, taking breaks every couple of hours to avoid potential strain.
➡️Removing the Device
- Release the Vacuum: Gently release the vacuum by pressing the valve on the chamber, allowing you to remove the device without discomfort.
- Disassemble and Clean: Disassemble the parts carefully, and wash the sluice, diaphragm, and chamber with warm water and mild soap. Dry all parts thoroughly before storing them.
➡️Daily and Weekly Cleaning
- Routine Cleaning: Clean the device daily to ensure it remains hygienic.
- Deep Clean Weekly: Once a week, perform a deeper clean by soaking components (like the diaphragm and sluice) in a mild disinfectant solution to prevent any buildup.
➡️Tracking Your Progress
- Measure Consistently: Keep track of your size and progress weekly to monitor improvements.
- Adjust Tension as Needed: Over time, increase the tension or change the rods/belt length as advised by the manufacturer to continue seeing progress.
Tips for Best Results
- Patience is Key: Results with PeniMaster PRO take time and consistency.
- Follow Manufacturer’s Guidelines: Always refer to the user manual for any specific recommendations.
- Consult with a Medical Professional: If you have any medical concerns or experience discomfort, consult a healthcare provider.
➡️Conclusion
Summarize the key aspects that make Penimaster PRO a reputable choice, emphasizing its versatility, the scientifically backed vacuum technology, and the options for customization based on user needs.
ORDER PENIMASTER PRO AT THE BEST PRICE https://geni.us/penimaster
0
0 comments
Penimaster PRO Detailed User Review: Packages and Usage